
Gelato Connect has redesigned the main menu, which makes it faster and easier to navigate between modules, find the pages you use most, and understand where you are at any point in the application. This article walks you through all the key changes.
What's New at a Glance
The redesigned menu introduces four key improvements:
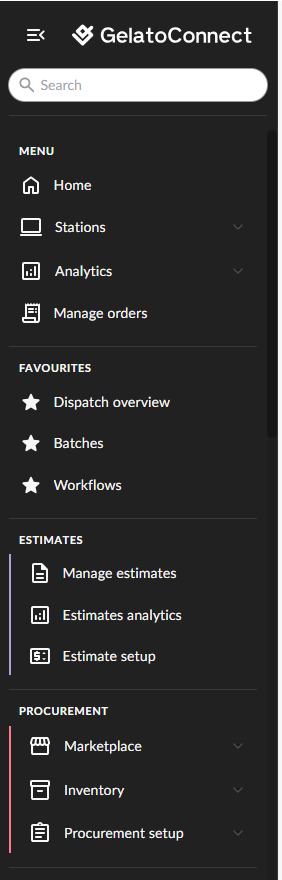
Updated visual design — A darker, higher-contrast sidebar that makes icons and labels easier to read.
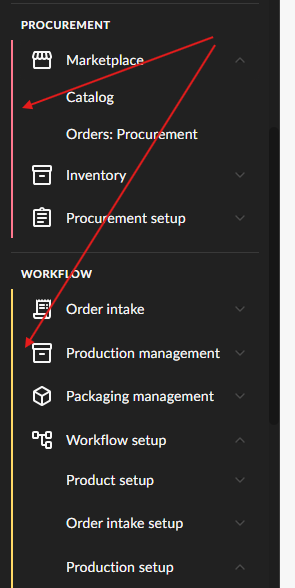
User-journey grouping — Pages are organised around how you actually work: Estimates, Procurement, Workflow, and Logistics.
Module colour coding — Each module has a distinct accent colour, so you always know which area you're working in.
Favourites area — Pin any page to the Favourites area in the menu for instant one-click access.
Updated Visual Design
The sidebar now uses a darker background with improved contrast, making the icons and labels clearer — especially on smaller screens or in bright environments. Icons are shown at the first level of the menu, providing quick visual recognition without requiring you to read the text label.
Module Grouping and Colour Coding
The menu is now structured around the four main operational modules:
Estimates
Procurement
Workflow
Logistics
Each module has a distinct colour that persists as you navigate within it. For example, when you open any page inside Procurement — such as the Marketplace — the sidebar retains the Procurement colour accent. This persistent colouring gives you a constant visual clue about which module you're currently in.
Setup options for each module (Estimate setup, Procurement setup, Workflow setup, and Logistics setup) are consistently placed as the last item within their respective module section.
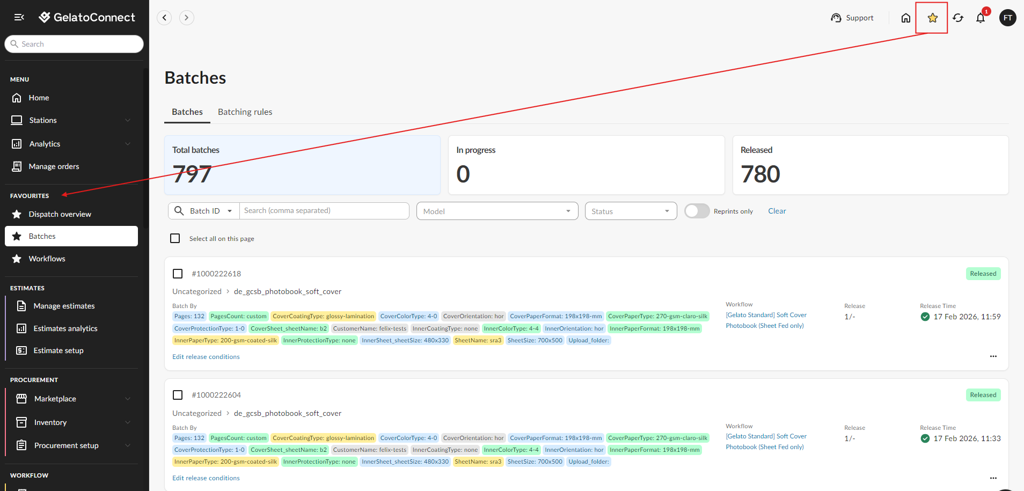
Using the Favourites Area
The Favourites area is the most powerful improvement in the new menu. It lets you pin any page — across any module — so that it appears at the Favourites area of your menu for instant access. You can add as many pages as you like.
Adding a page to Favourites
Navigate to the page you want to bookmark.
Click the star icon in the top-right corner of the page.
The star turns yellow to confirm the page has been added. It will now appear in the Favourites section at the top of the menu.
Removing a page from Favourites
Click the yellow star icon again on the same page. The star reverts to an empty outline, and the page is removed from the Favourites section.
Order of Favourites
Pages appear in the Favourites section in the order you starred them — most recently starred pages appear at the bottom.
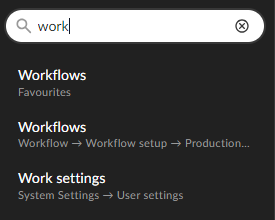
Improved Search with Breadcrumbs
The search bar now displays breadcrumbs alongside each result, so you can immediately see where a page lives before navigating to it. For example, searching for "Inventory Management" will show it as:
Procurement > Inventory > Inventory Management
This makes it much easier to distinguish between pages that share similar names across different modules.
💡 Tip: Start by starring the 3–5 pages you open every day. Your Favourites will immediately cut the clicks you need to get to your most important workflows.