This guide provides step-by-step instructions for integrating GelatoConnect with Hyble, enabling seamless order flow from Hyble's platform directly to your production workflow. With this integration orders from Hyble flow directly into GelatoConnect without manual intervention and Hyble can track and manage orders through your production process via Gelato Headquarters.
Step-by-Step Integration Process
Step 1: Customer Setup in GelatoConnect
First, you need to create a dedicated customer profile for Hyble:
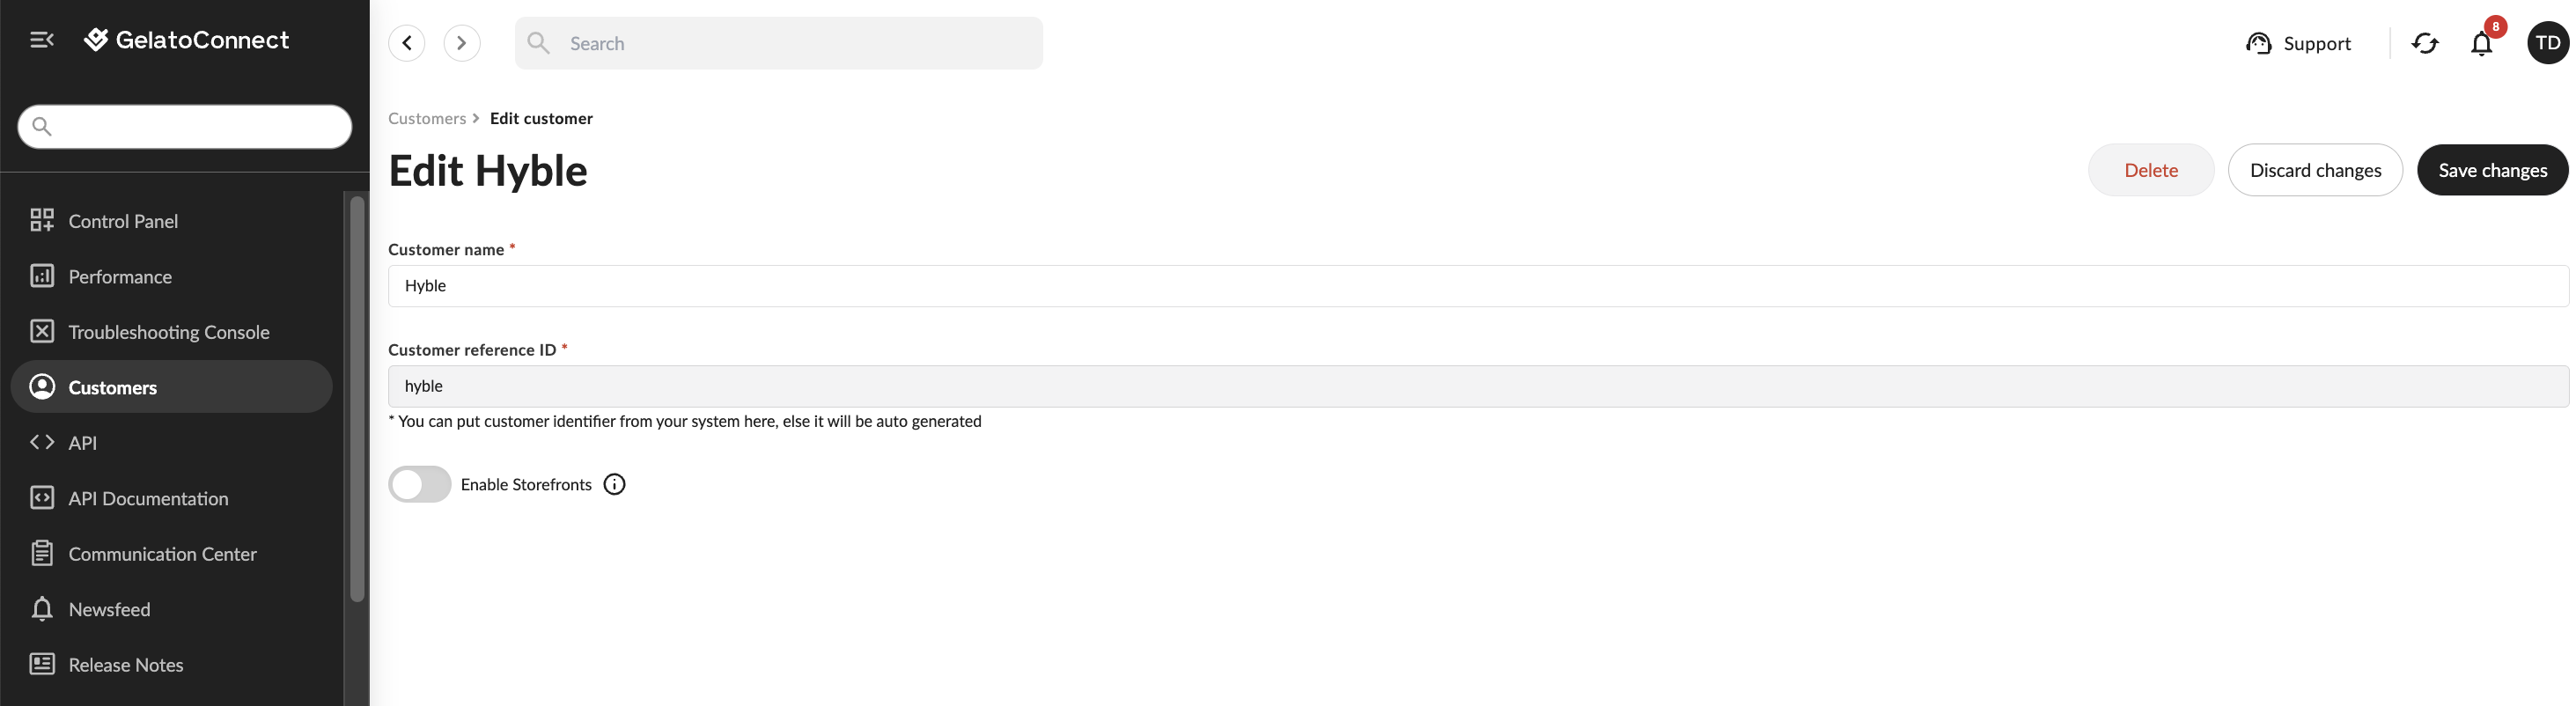
Navigate to Customers Section
Log in to your GelatoConnect account
Go to the Customers section in the left navigation menu
Click "Create Customer"
Configure Customer Details
Customer Name: Enter
HybleCustomer Reference ID: Enter
hybleClick "Create" to save the customer profile
Step 2: Configure Customer Shipping Markup
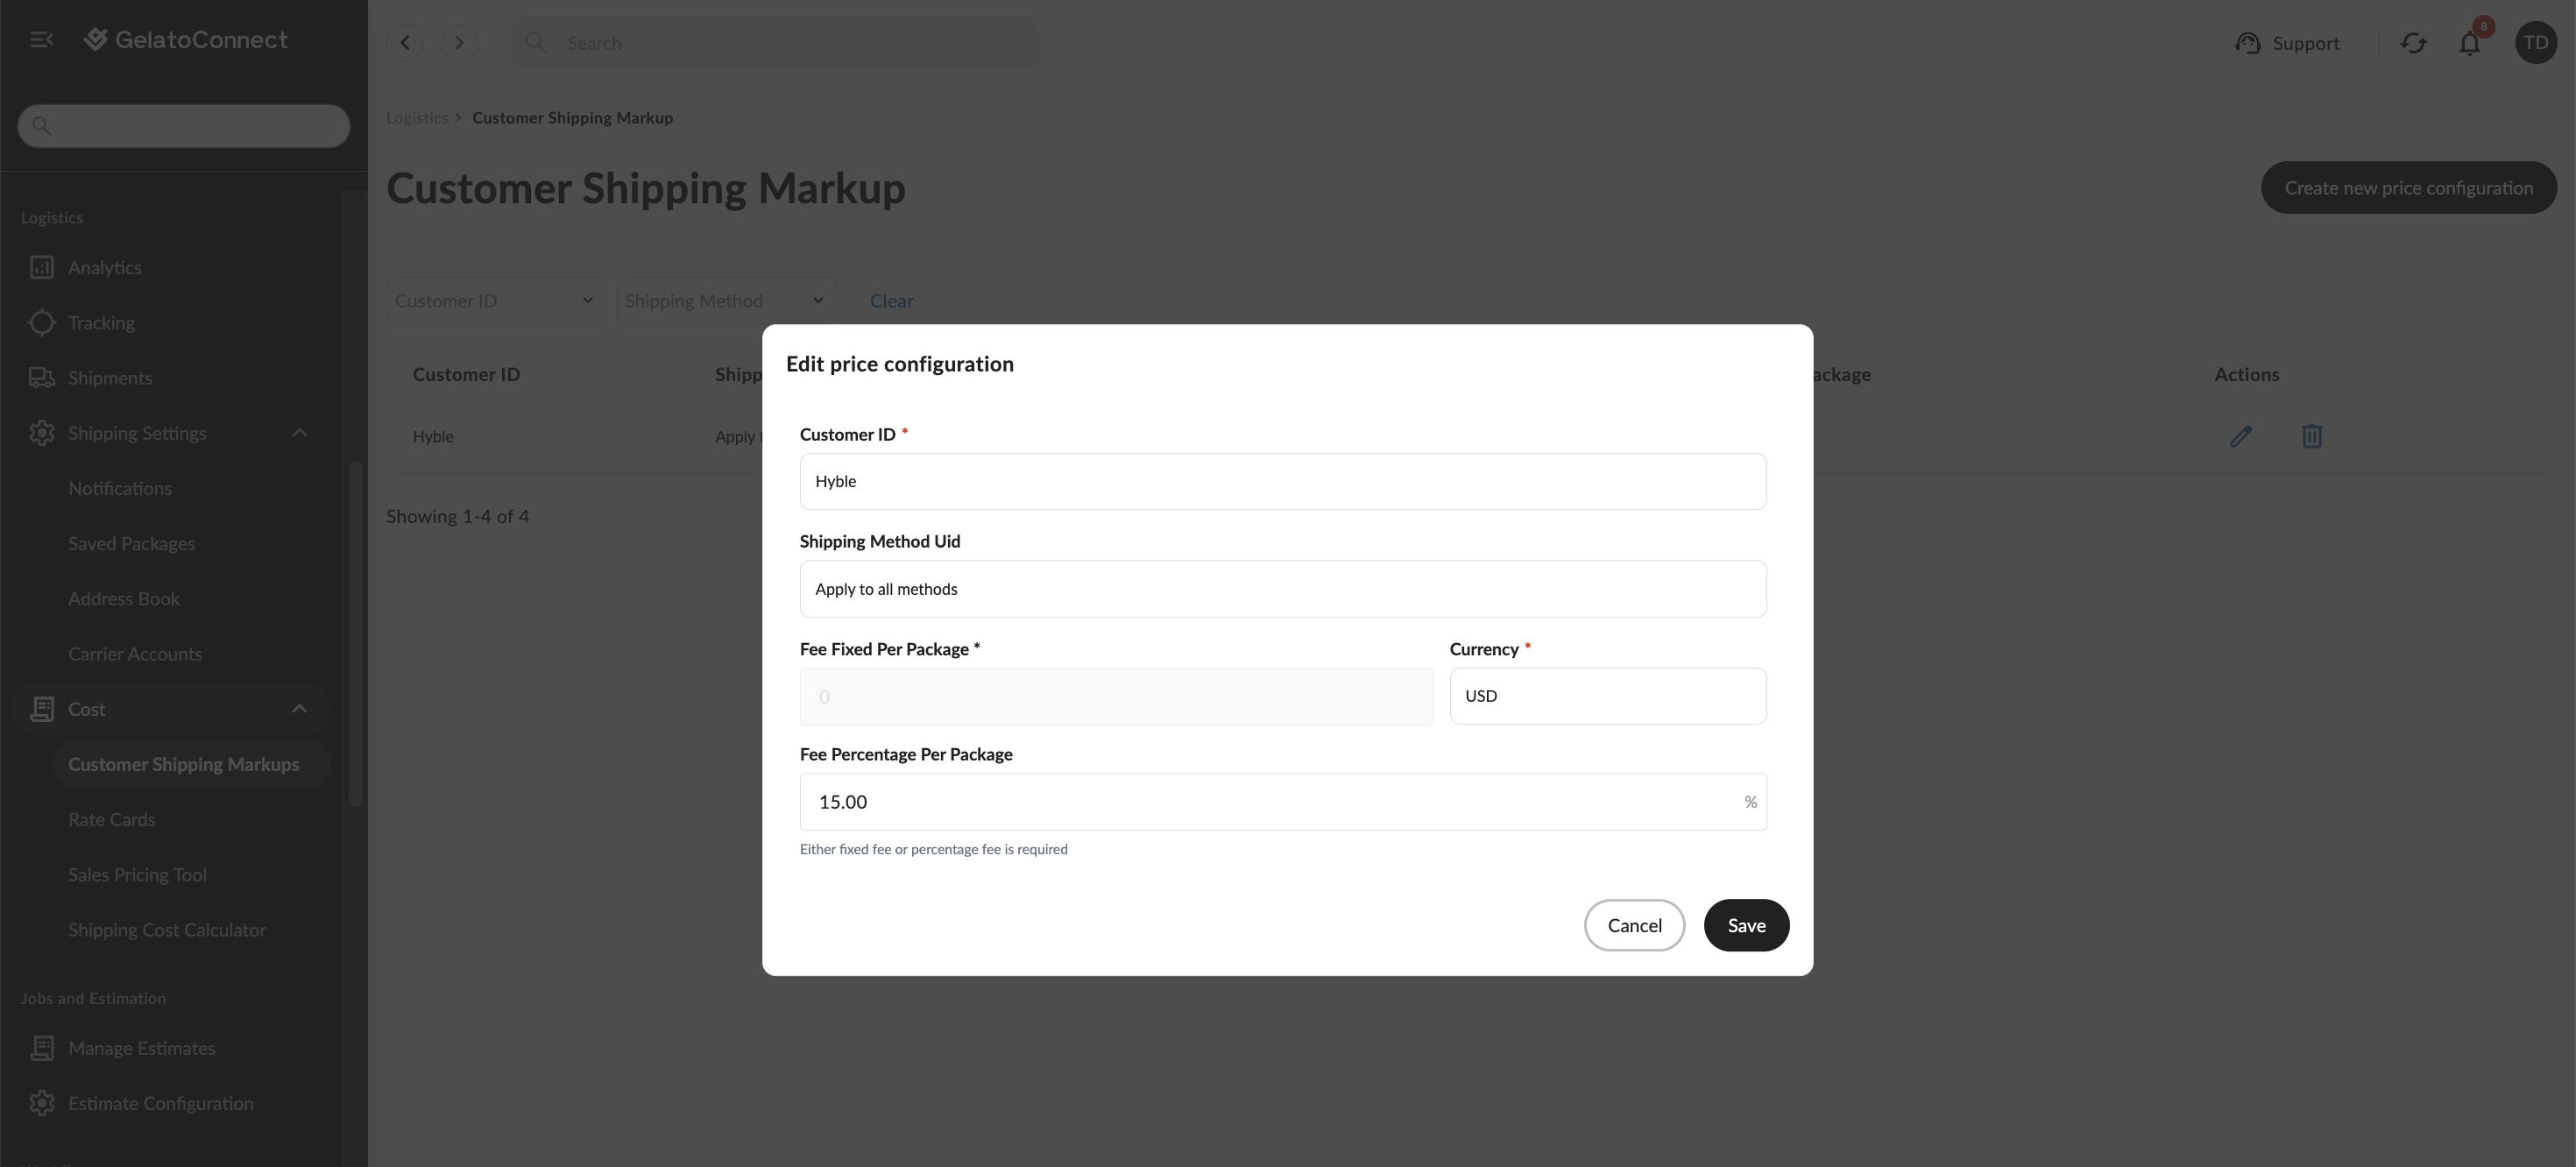
Important: Before providing Hyble with the API connector details you should be certain you have created a new price configuration on the Customer Shipping Markup page found within the Logistics > Cost > Customer Shipping Markups sidebar menu.
This step ensures Hyble receive shipping quotes with your GCL shipping markup applied.
Step 3: Connector Setup
Next, you'll need to set up an API connector to enable communication between Hyble and GelatoConnect:
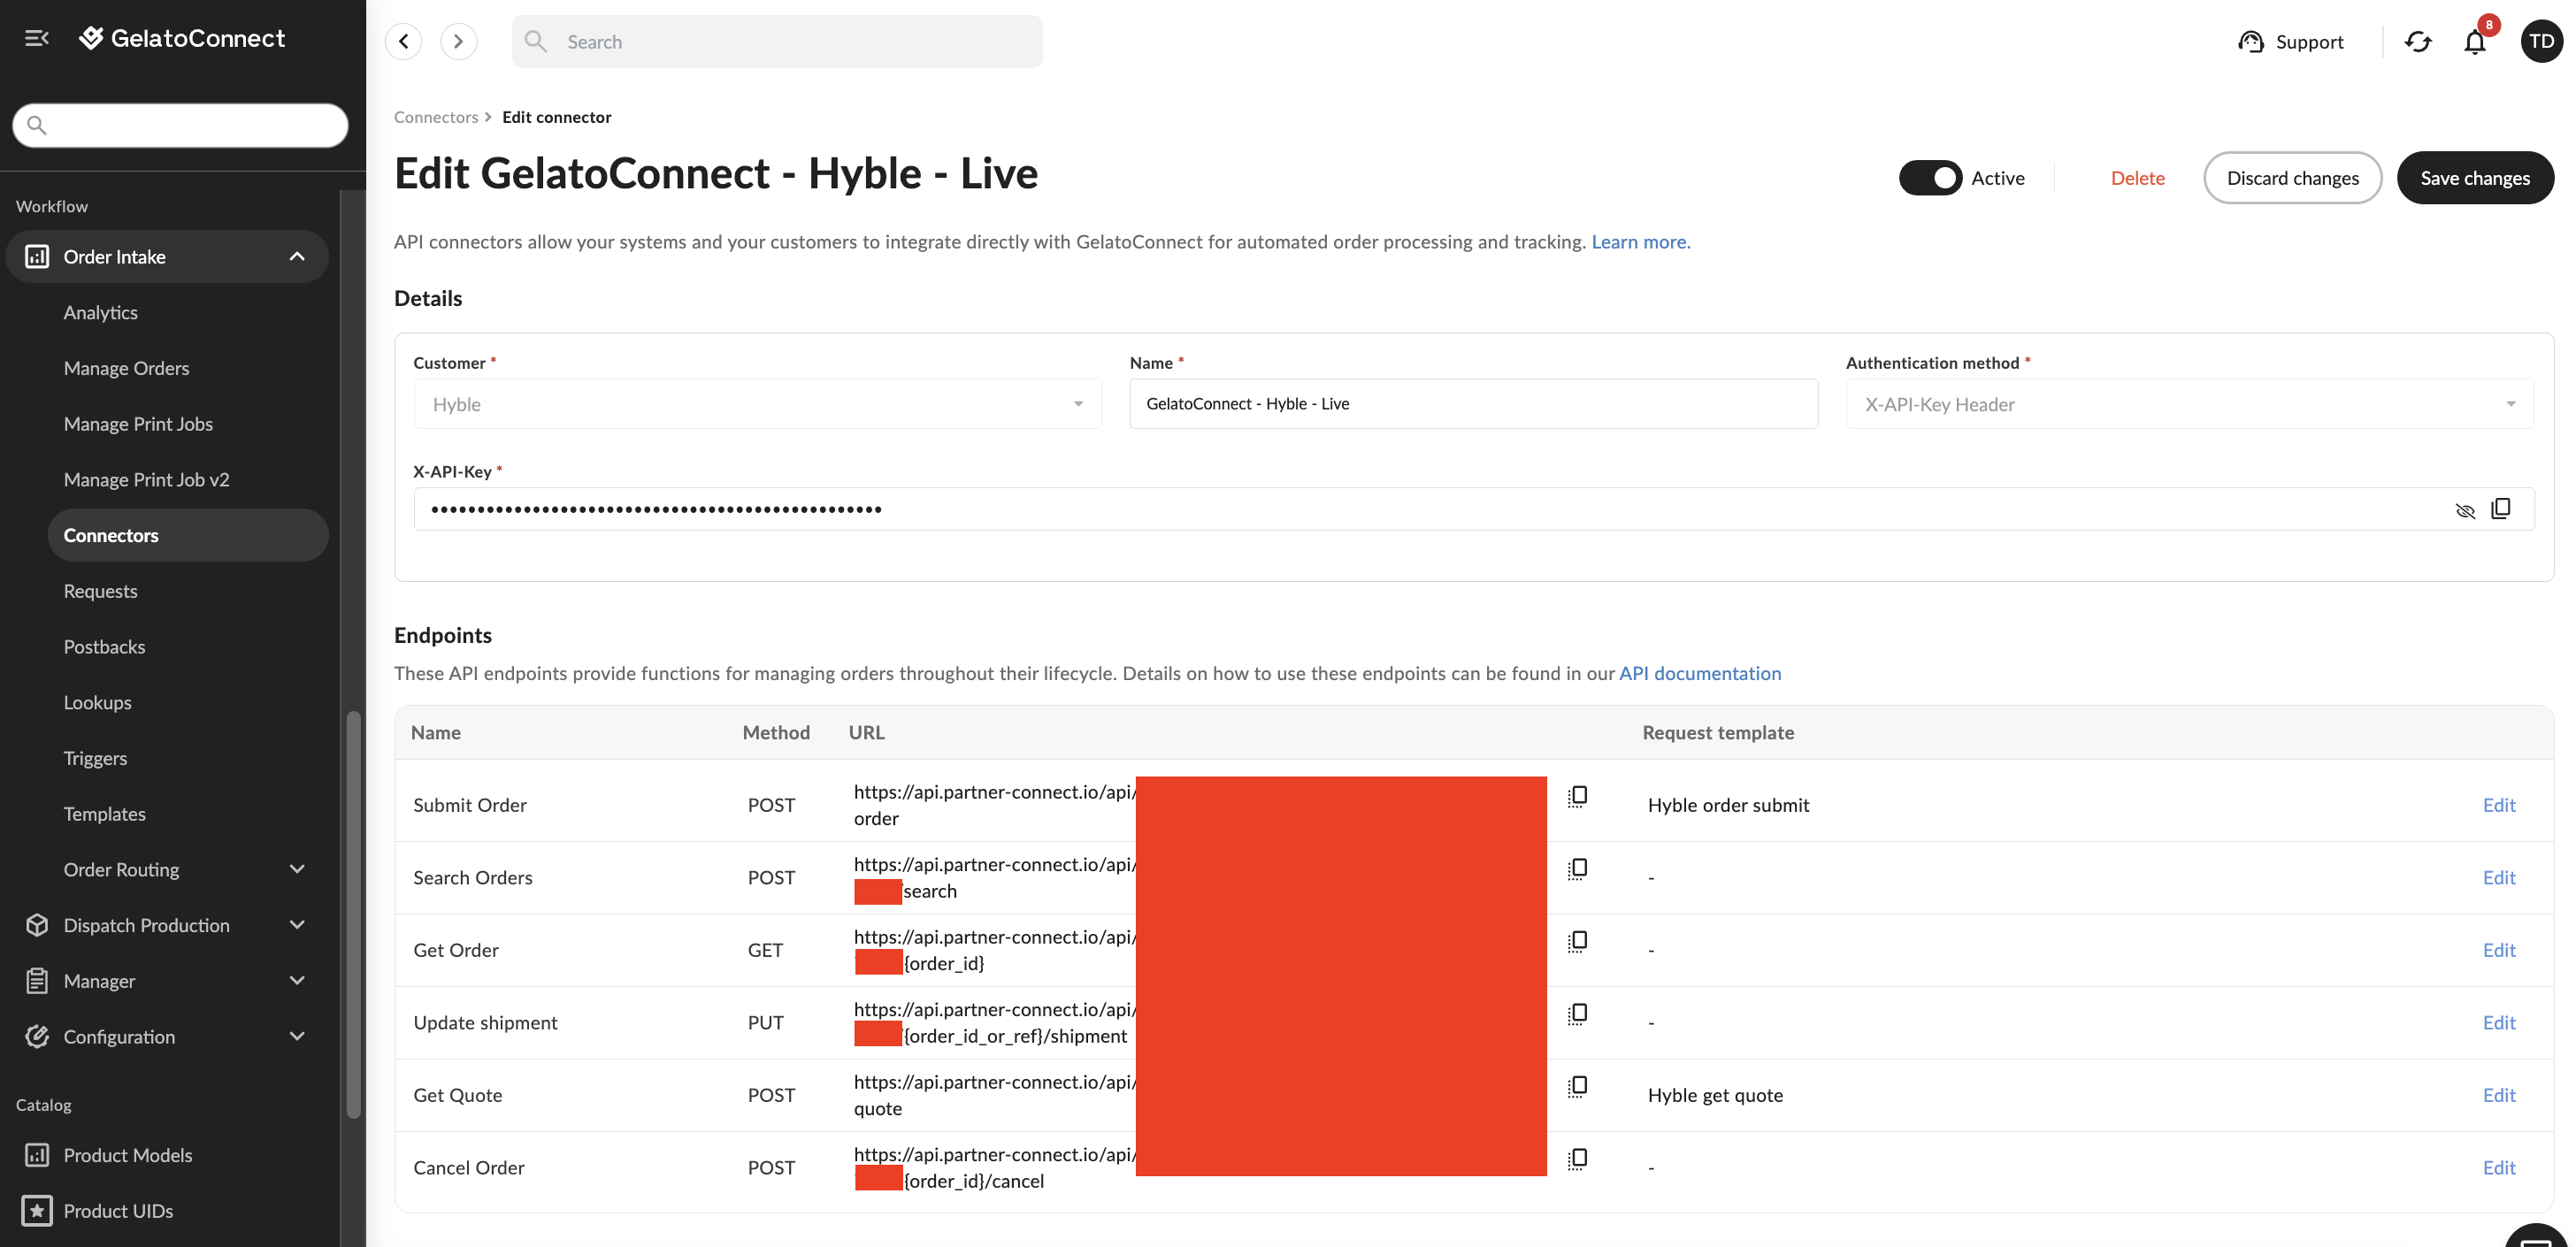
1) Create API Connector
Navigate to Workflow > Order Intake > Connectors
Click "Add Connector"
Select "API Connector"
Choose the Hyble customer you created in Step 1
Give the connector the name
GelatoConnect - Hyble - LiveSave the connector by clicking Create connector
2) Create a new order submit template
An order submission template will transform the order data received from Hyble into the format required by GelatoConnect.
Navigate to Workflow > Order Intake > Templates
Click "Add Template"
Give the template name: Hyble order submit
Choose the customer Hyble
Choose the type "Order Submit Request"
Choose the format JSON
Click "Generate template"
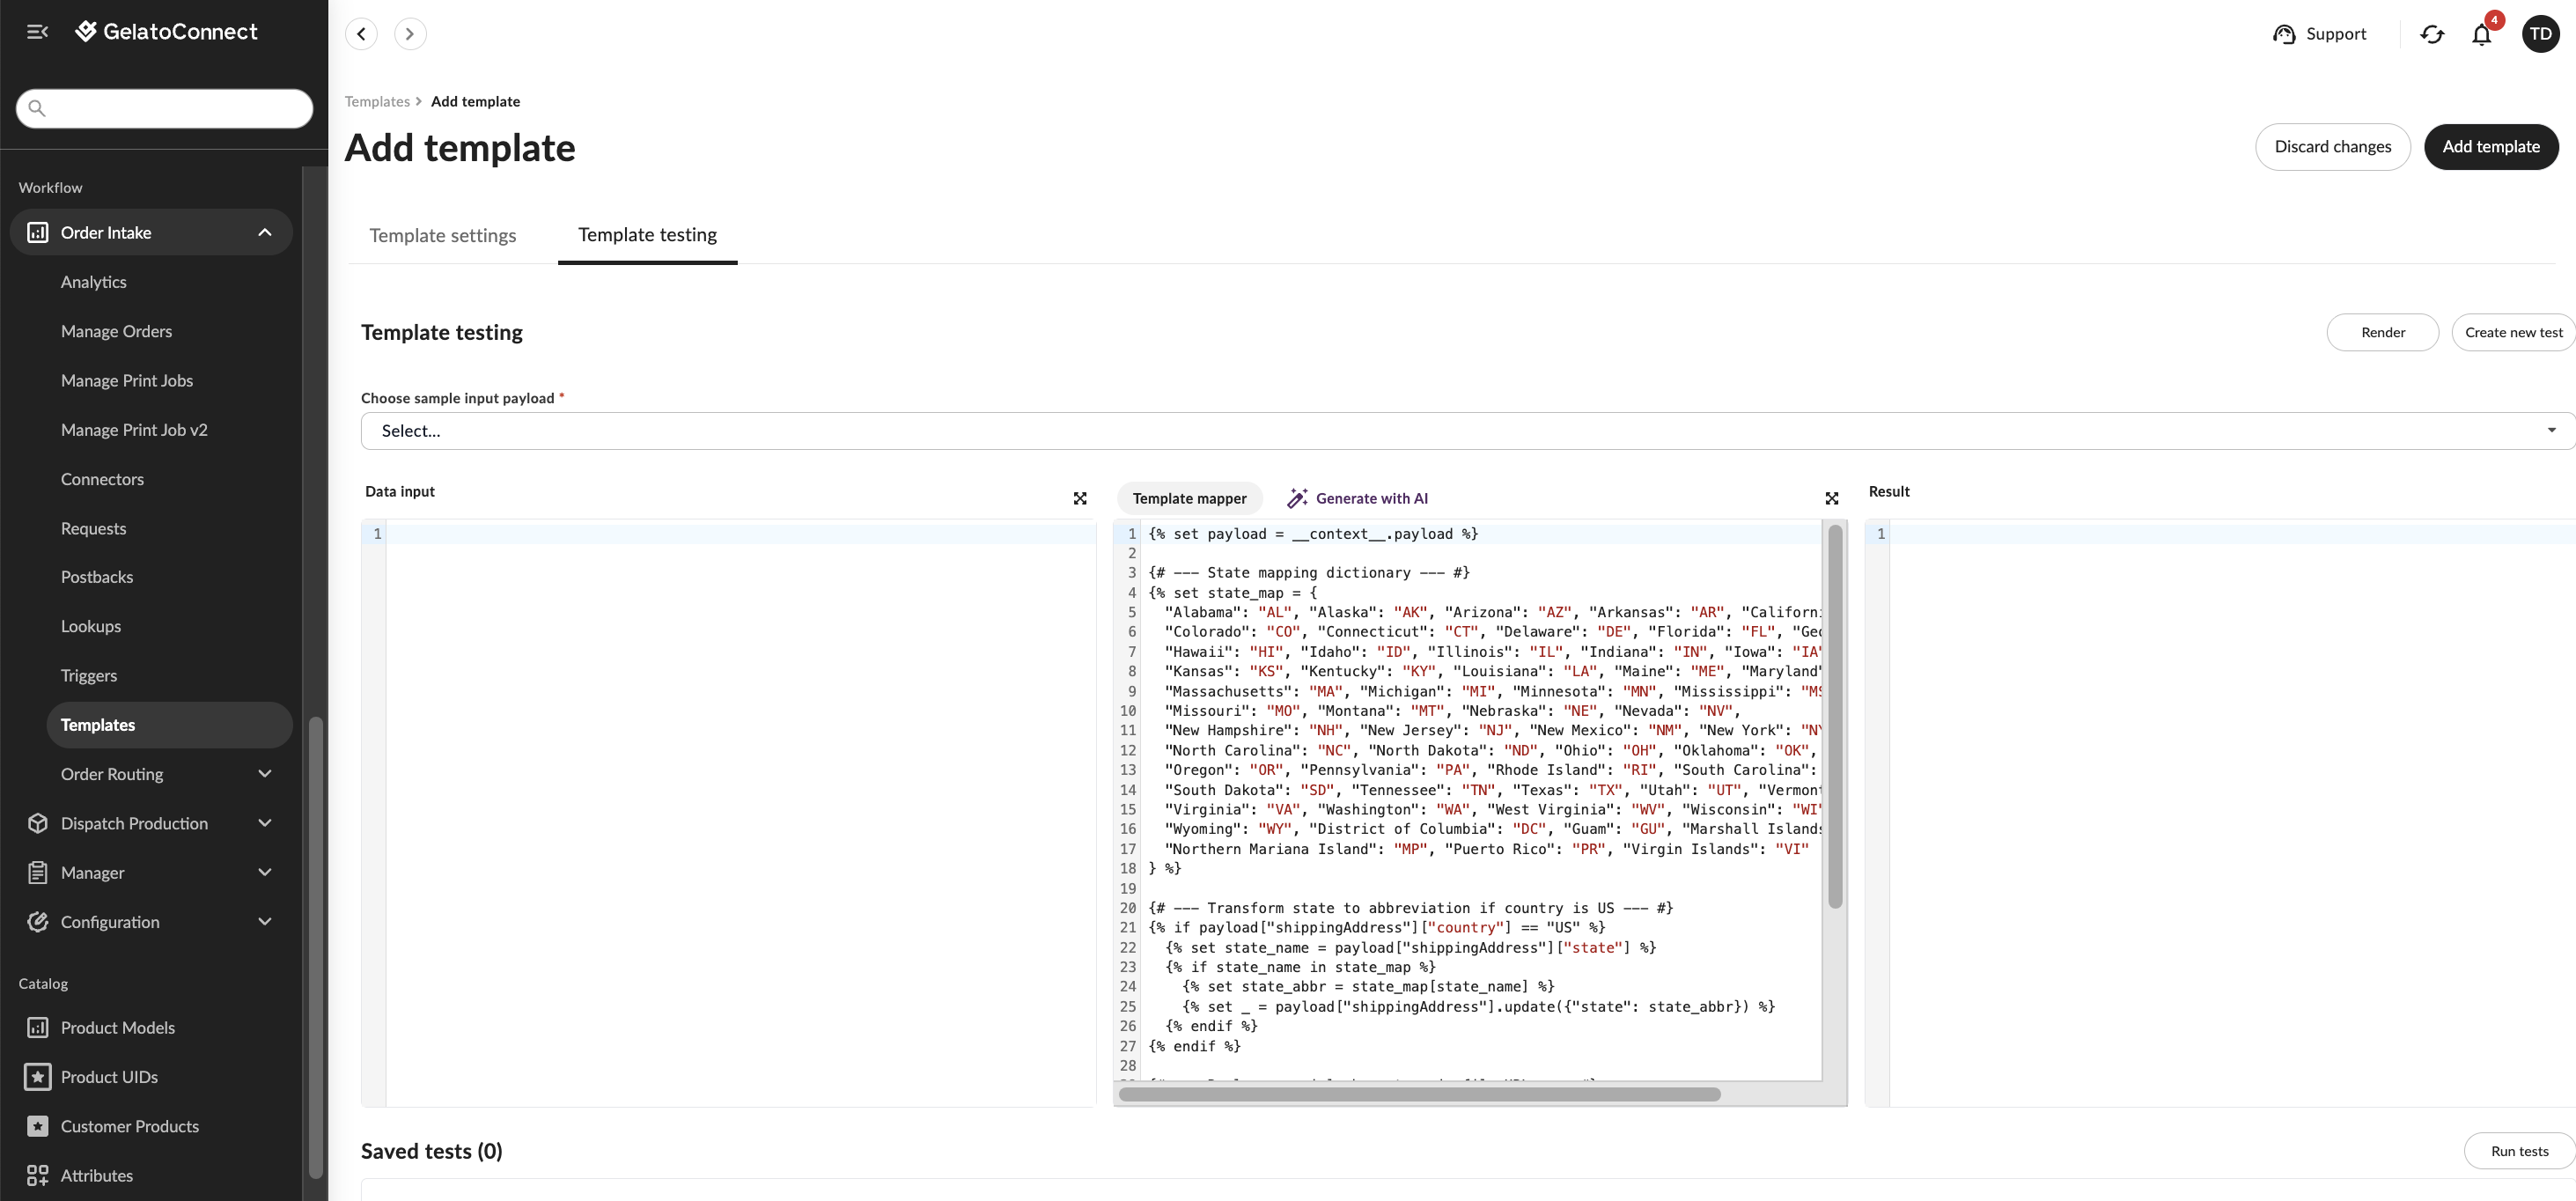
In the template mapper section in the middle add the code below.
Click "Add template" in the top right to save the new template.
{% set payload = __context__.payload %}

{# --- State mapping dictionary --- #}
{% set us_state_map = {
  "Alabama": "AL", "Alaska": "AK", "Arizona": "AZ", "Arkansas": "AR", "California": "CA",
  "Colorado": "CO", "Connecticut": "CT", "Delaware": "DE", "Florida": "FL", "Georgia": "GA",
  "Hawaii": "HI", "Idaho": "ID", "Illinois": "IL", "Indiana": "IN", "Iowa": "IA",
  "Kansas": "KS", "Kentucky": "KY", "Louisiana": "LA", "Maine": "ME", "Maryland": "MD",
  "Massachusetts": "MA", "Michigan": "MI", "Minnesota": "MN", "Mississippi": "MS",
  "Missouri": "MO", "Montana": "MT", "Nebraska": "NE", "Nevada": "NV",
  "New Hampshire": "NH", "New Jersey": "NJ", "New Mexico": "NM", "New York": "NY",
  "North Carolina": "NC", "North Dakota": "ND", "Ohio": "OH", "Oklahoma": "OK",
  "Oregon": "OR", "Pennsylvania": "PA", "Rhode Island": "RI", "South Carolina": "SC",
  "South Dakota": "SD", "Tennessee": "TN", "Texas": "TX", "Utah": "UT", "Vermont": "VT",
  "Virginia": "VA", "Washington": "WA", "West Virginia": "WV", "Wisconsin": "WI",
  "Wyoming": "WY", "District of Columbia": "DC", "Guam": "GU", "Marshall Islands": "MH",
  "Northern Mariana Island": "MP", "Puerto Rico": "PR", "Virgin Islands": "VI"
} %}

{% set au_state_map = {
  "New South Wales": "NSW", "Victoria": "VIC", "Queensland": "QLD",
  "Western Australia": "WA", "South Australia": "SA", "Tasmania": "TAS",
  "Northern Territory": "NT", "Australian Capital Territory": "ACT"
} %}

{# --- Transform state to abbreviation if country is US --- #}
{% set state_name = payload["shippingAddress"]["state"] %}

{% if payload["shippingAddress"]["country"] == "US" and state_name in us_state_map %}
  {% set _ = payload["shippingAddress"].update({"state": us_state_map[state_name]}) %}
{% elif payload["shippingAddress"]["country"] == "AU" and state_name in au_state_map %}
  {% set _ = payload["shippingAddress"].update({"state": au_state_map[state_name]}) %}
{% endif %}

{# --- Replace special characters in file URLs --- #}
{%- for item in payload["items"] %}
  {%- for file in item["files"] %}
    {% set fixed_url = file["url"]
      .replace("–", "%E2%80%93")
      .replace(""", "%E2%80%9D")
    %}
    {%- set _ = file.update({"url": fixed_url}) %}
  {%- endfor %}
{%- endfor %}

{# --- Split first name into first/last if last name is blank --- #}
{% if not payload["shippingAddress"]["lastName"] | trim %}
  {% set name_parts = payload["shippingAddress"]["firstName"].split(" ", 1) %}
  {% if name_parts | length > 1 %}
    {% set _ = payload["shippingAddress"].update({"firstName": name_parts[0], "lastName": name_parts[1]}) %}
  {% endif %}
{% endif %}

{{ payload | tojson(indent=2) }}
3) Create a new get shipping quote template
A get quote template will transform the shipping quote request data Hyble send into the format required by GelatoConnect.
Navigate to Workflow > Order Intake > Templates
Click "Add Template"
Give the template name: Hyble get quote
Choose the customer Hyble
Choose the type "Order Submit Request"
Choose the format JSON
Click "Generate template"
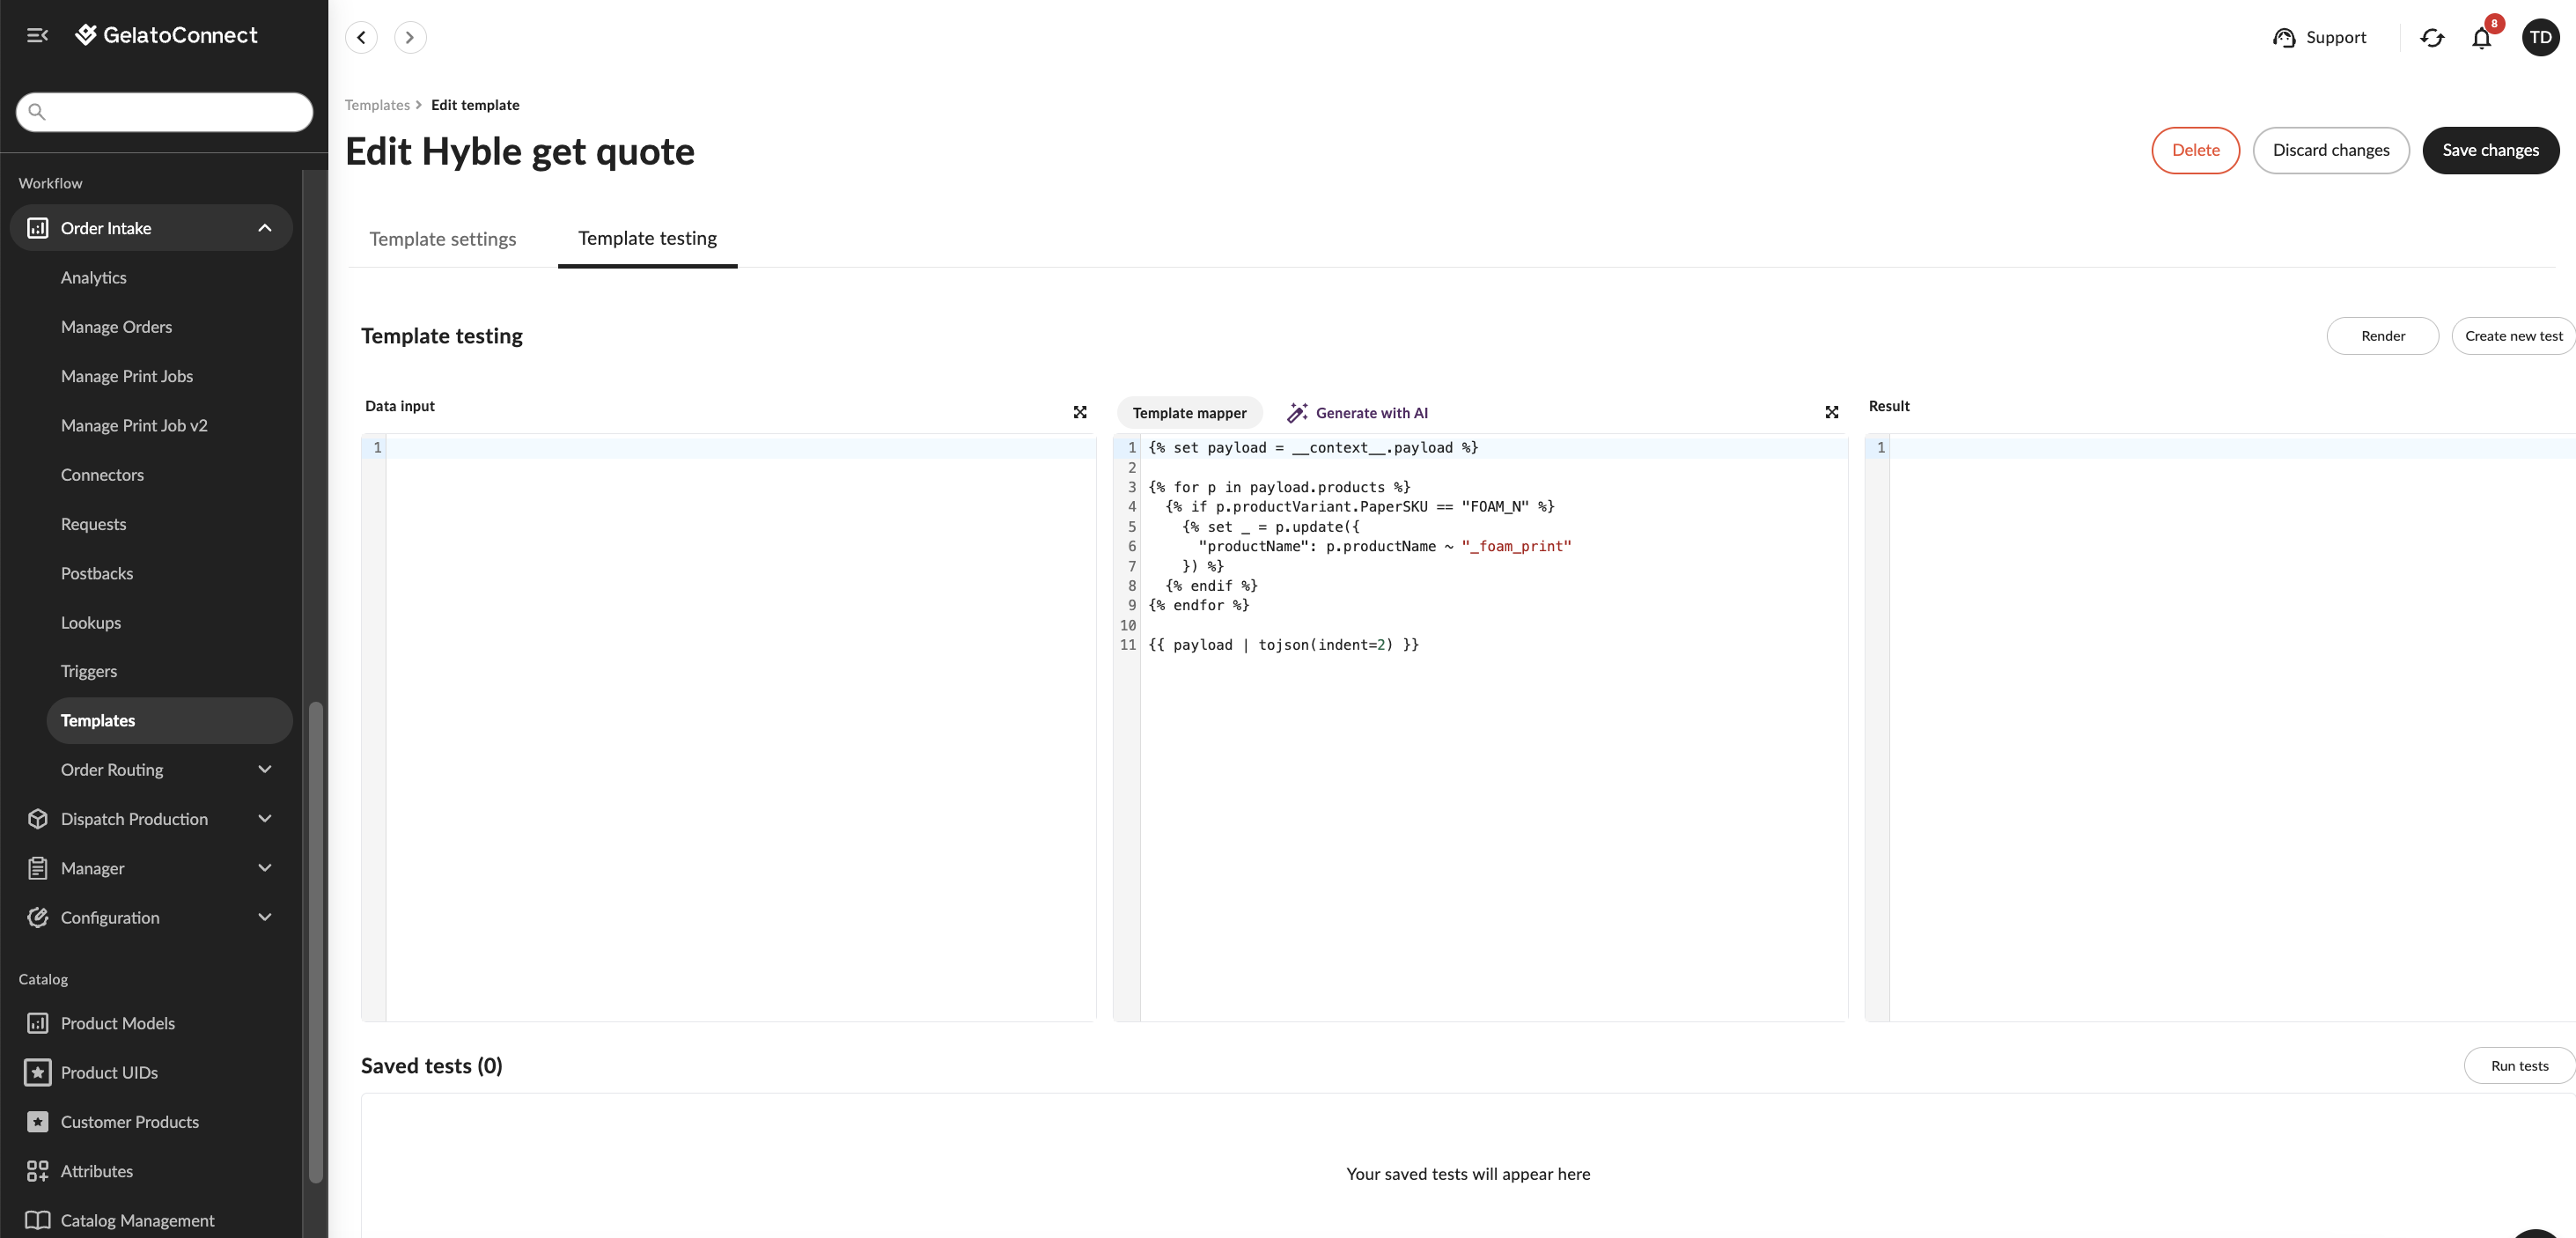
In the template mapper section in the middle add the code below.
Click "Add template" in the top right to save the new template.
{% set payload = __context__.payload %}

{% for p in payload.products %}
  {% if p.productVariant.PaperSKU == "FOAM_N" %}
    {% set _ = p.update({
      "productName": p.productName ~ "_foam_print"
    }) %}
  {% endif %}
{% endfor %}

{{ payload | tojson(indent=2) }}
4) Link the order submit and get quote templates to the API connector endpoints
Next navigate back to the connector you created in Step 3.1
GelatoConnect - Hyble - LiveNext to the order submit endpoint click on the Edit hyperlink
In the dropdown below "Request template" select the order submit template you created in Step 3.2
Then click "Set endpoint" in the top right and then "Save changes" in the top right of the connector page.
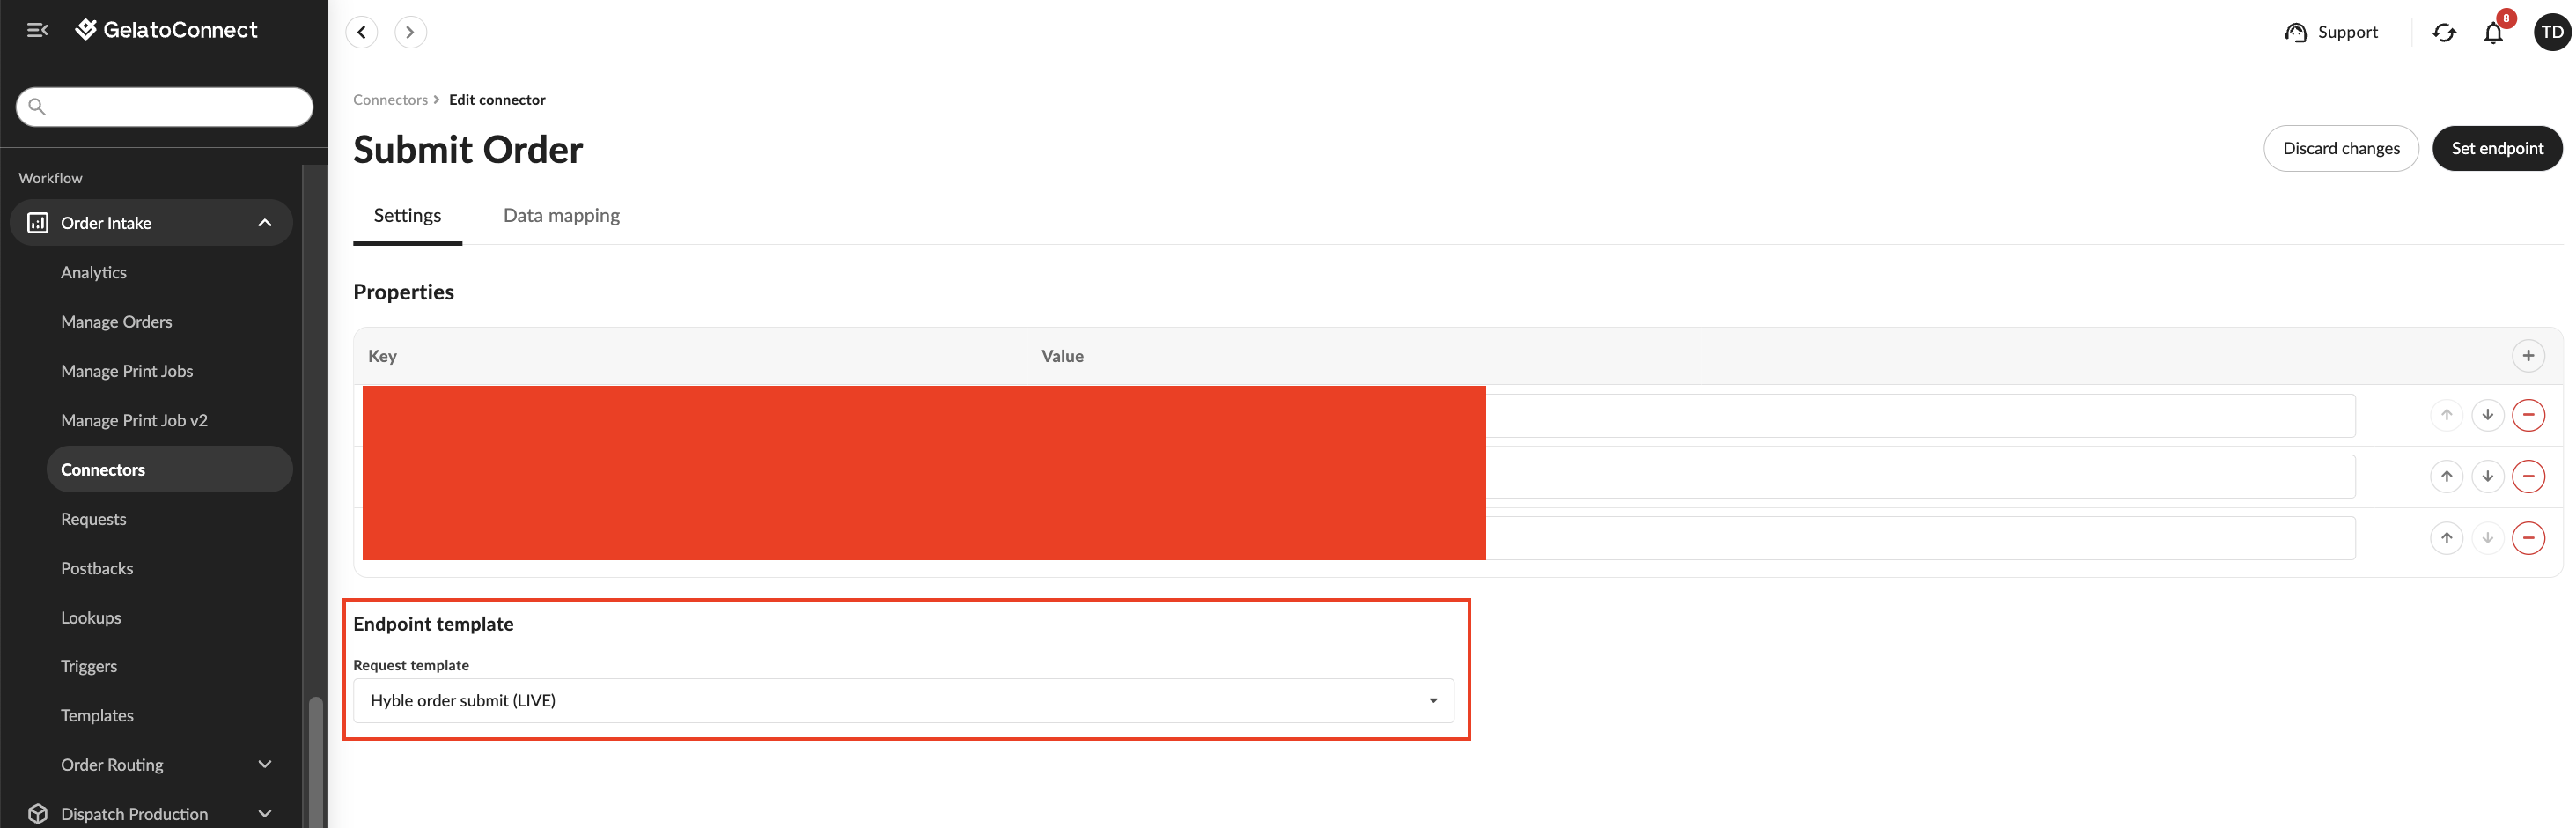
Steps 1 to 4 should also be repeated for the get shipping quote endpoint and the template created in Step 3.3.
5) Share API connector credentials with Hyble
After creating the connector, you'll need to share the Connector ID and X-API-KEY with the Hyble team. These credentials will allow Hyble to send orders to your GelatoConnect facility and track their status.
The connector ID is the GUID which can be found in each of the endpoints generated with your API connector e.g. f35d4853-ca8c-41e7-ac86-315be75e9158.
Step 4: Enable GelatoHQ Access for Hyble
To provide Hyble with visibility into order progress and status updates reach out to your GelatoConnect account manager and request that Hyble be granted access to GelatoHQ for order management.
Step 5: Product Configuration
Next you will need to configure Hyble products in GelatoConnect:
1. Navigate to the product model page within GelatoConnect
2. Click on "Create new Product model" in the top right and then "Add from customer"
3. Select Hyble from the list of pre-configured brands
4. Select which Hyble products you want to be setup within your GelatoConnect account and click Continue.
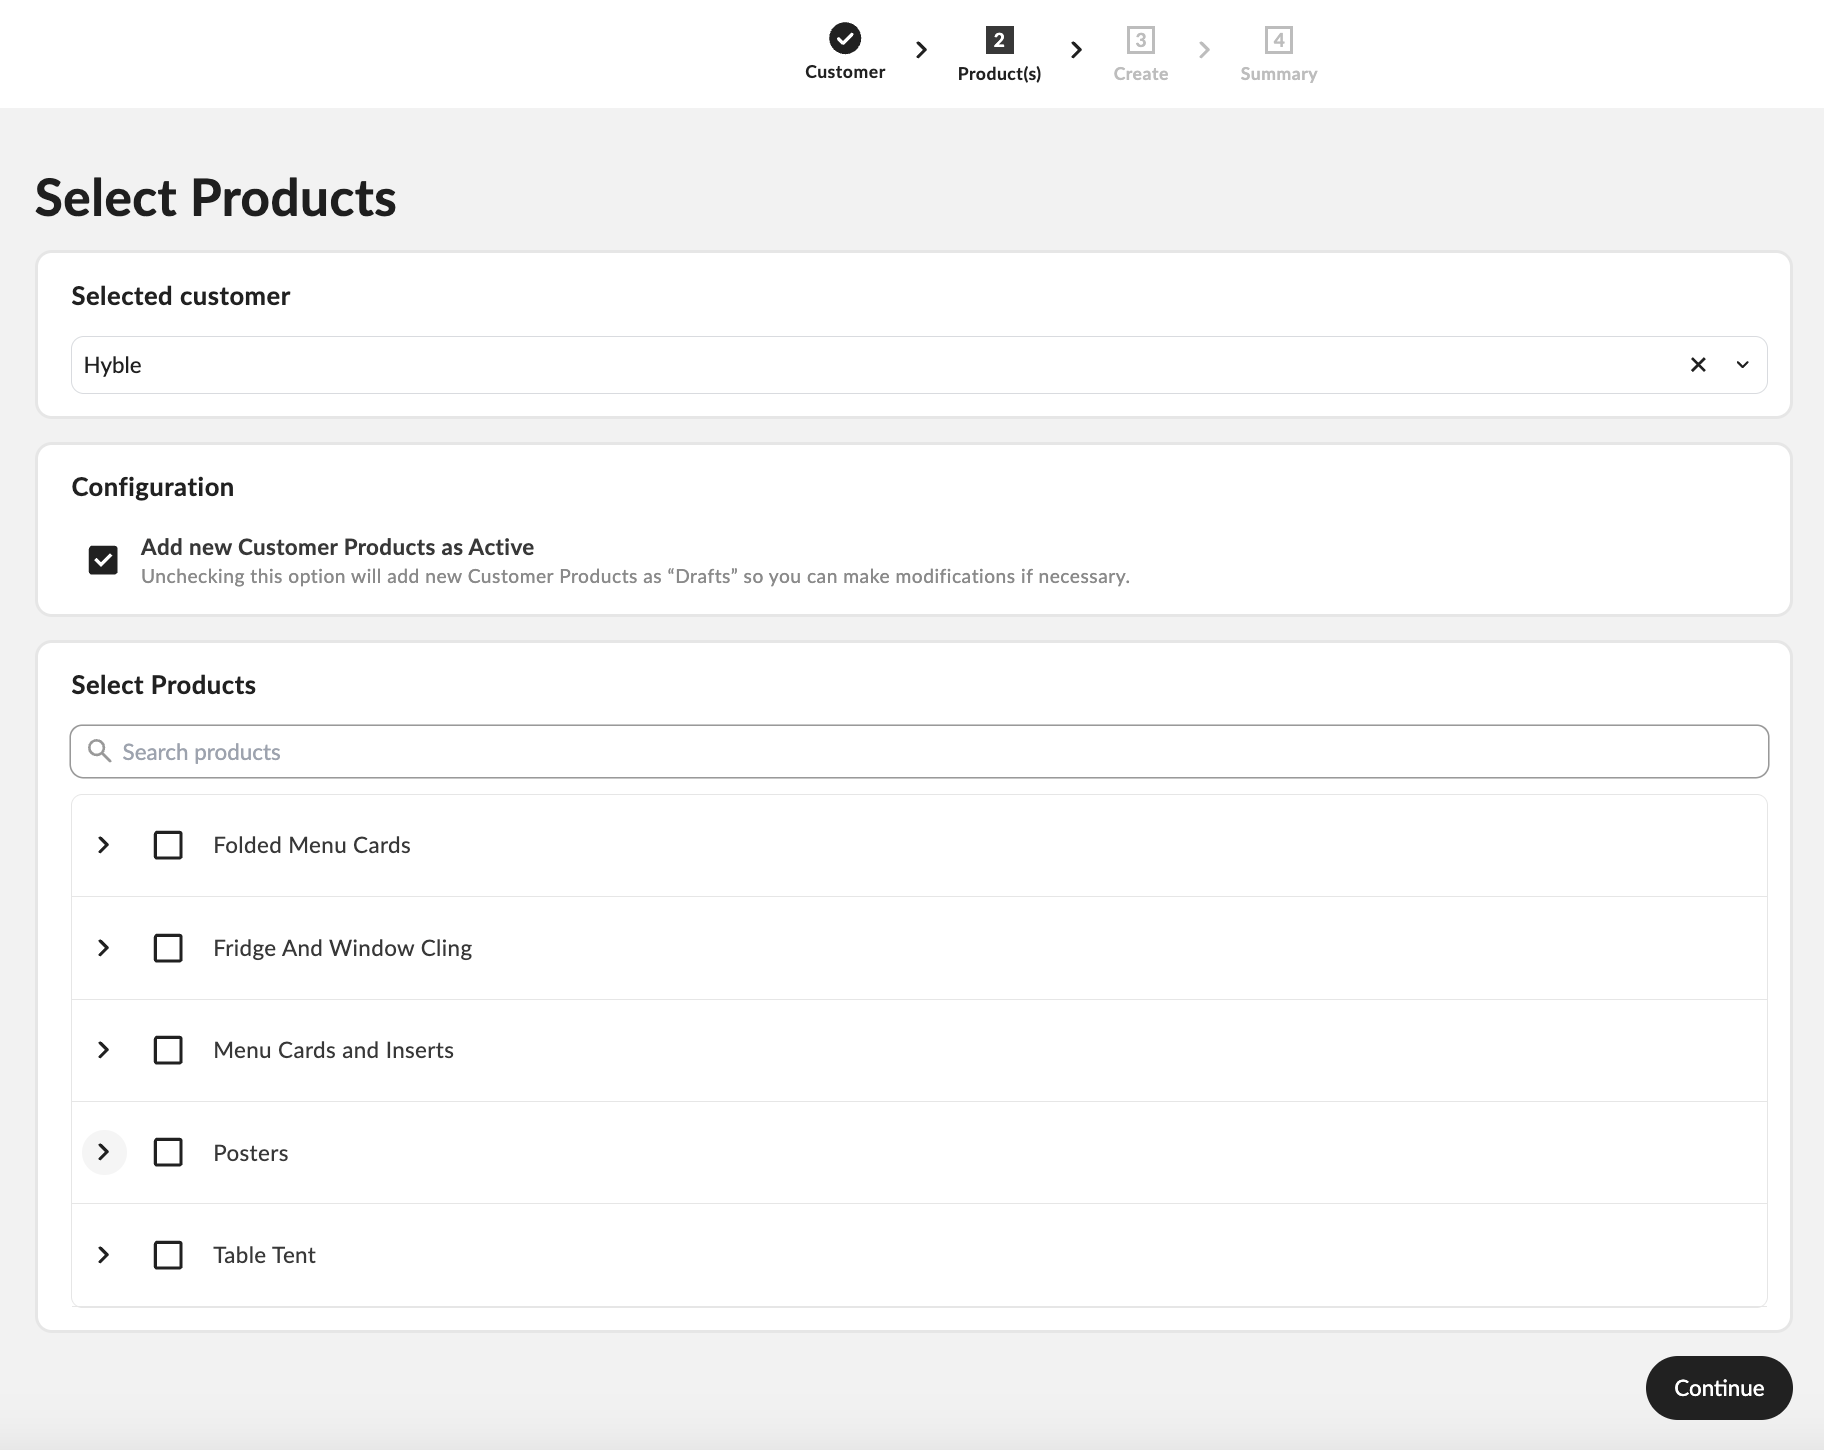
5. You will then be presented with variables you can configure e.g. selecting which paper type should be used for each of the Hyble products.
6. The Hyble products will subsequently be setup in your GelatoConnect account.
Step 6: Set up order status postbacks
Postbacks ensure Hyble is kept updated about the current order status throughout each step of production and shipment.
1) Create a new template to transform GelatoConnect order status update event data into the format Hyble needs to receive:
Navigate to Workflow > Order Intake > Templates
Click "Add Template"
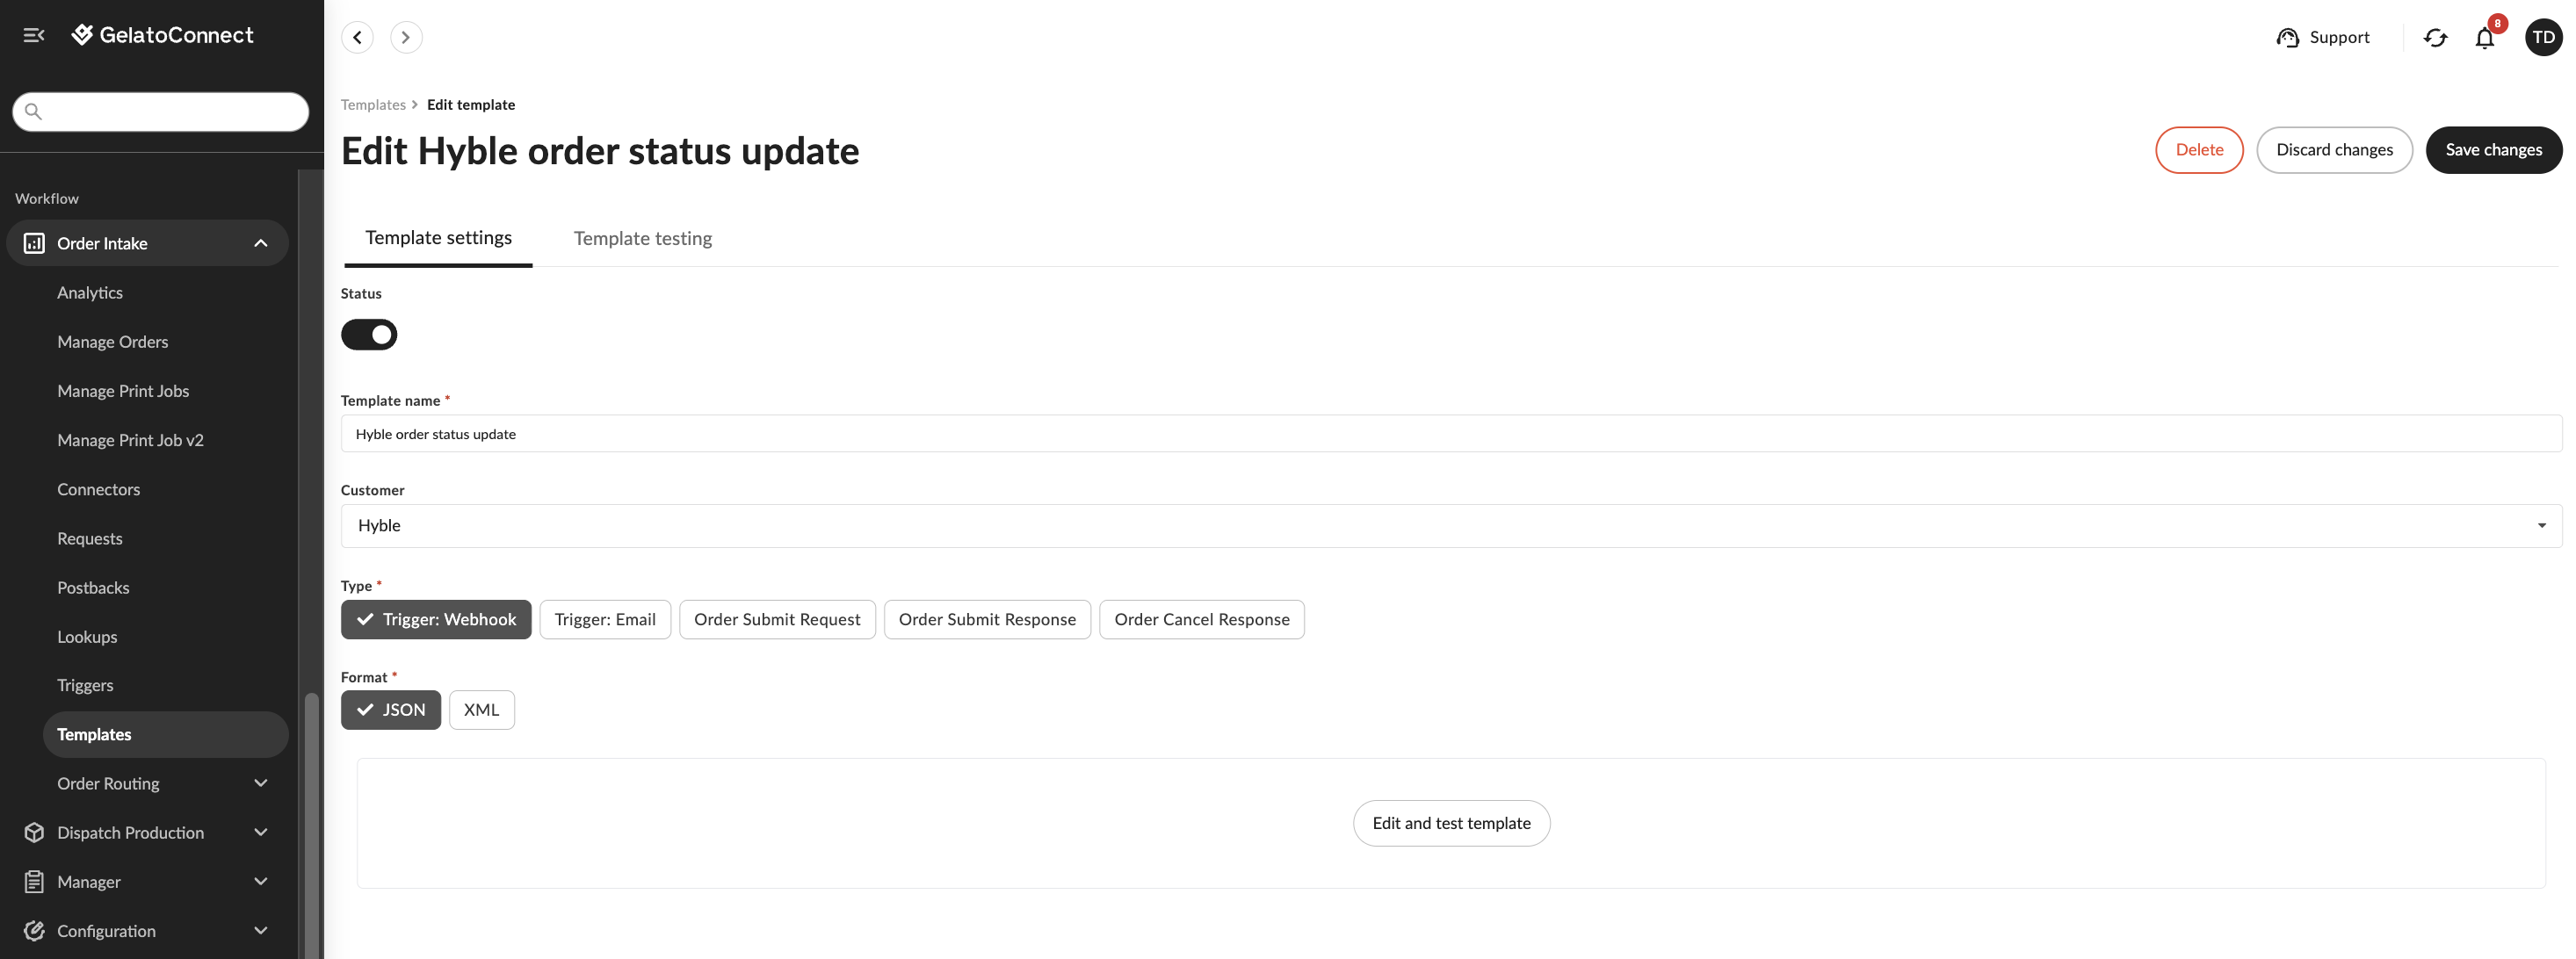
Give the template name: Hyble order status update
Choose the customer Hyble
Choose the type "Trigger: Webhook"
Choose the format JSON
Click "Generate template"
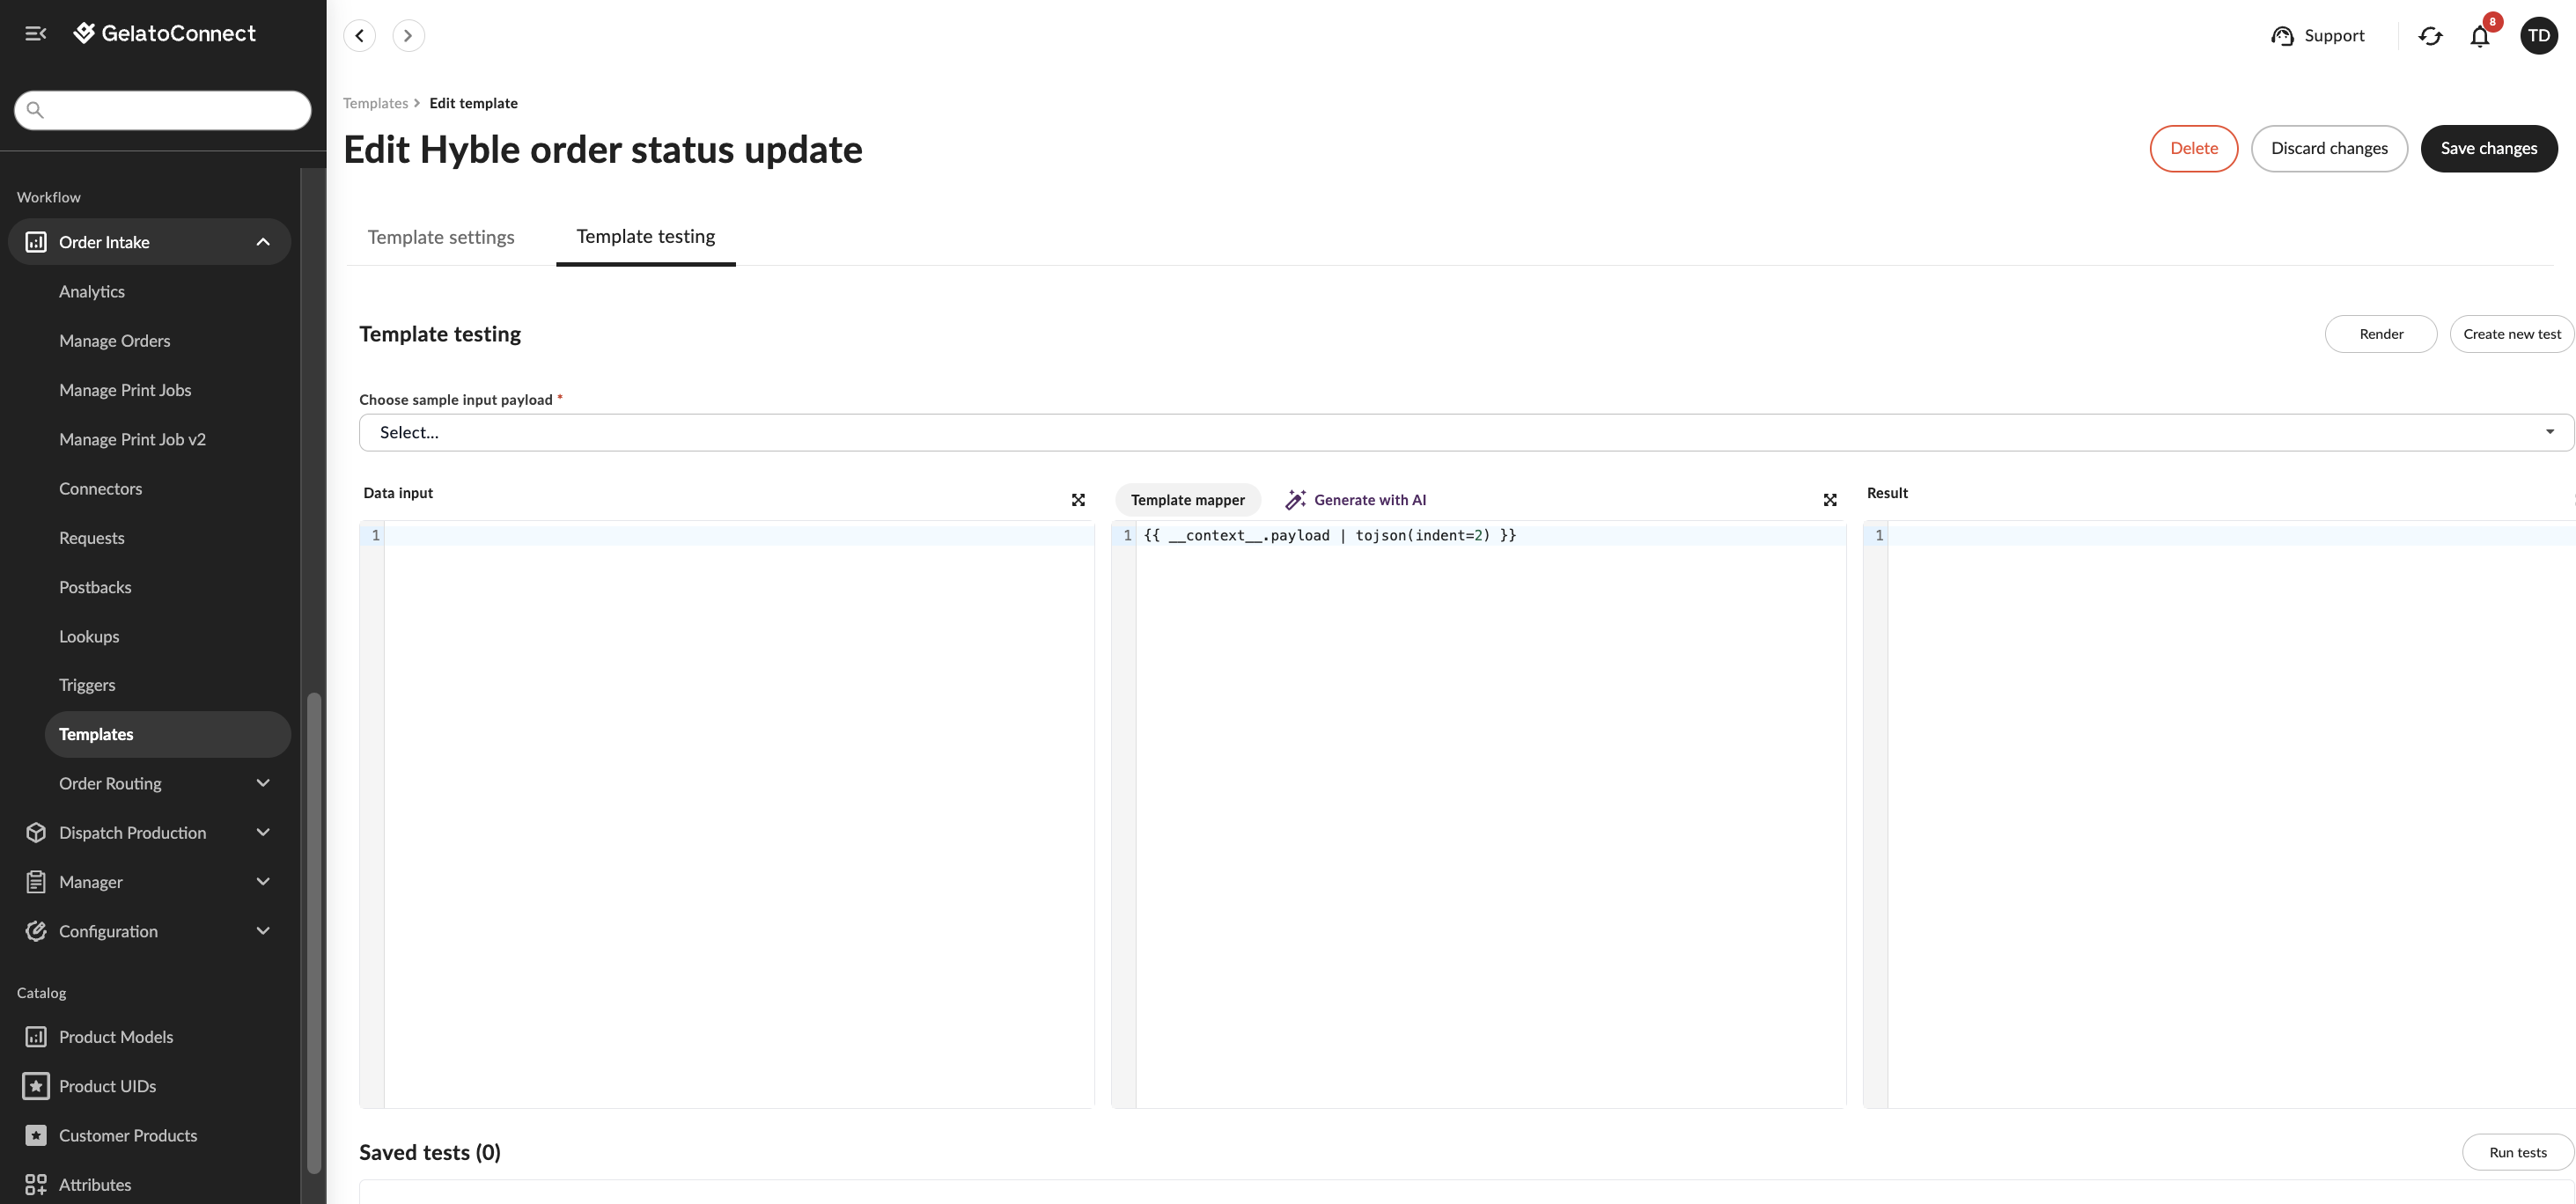
In the template mapper section in the middle add the code below.
Click "Add template" in the top right to save the new template.
{{ __context__.payload | tojson(indent=2) }}
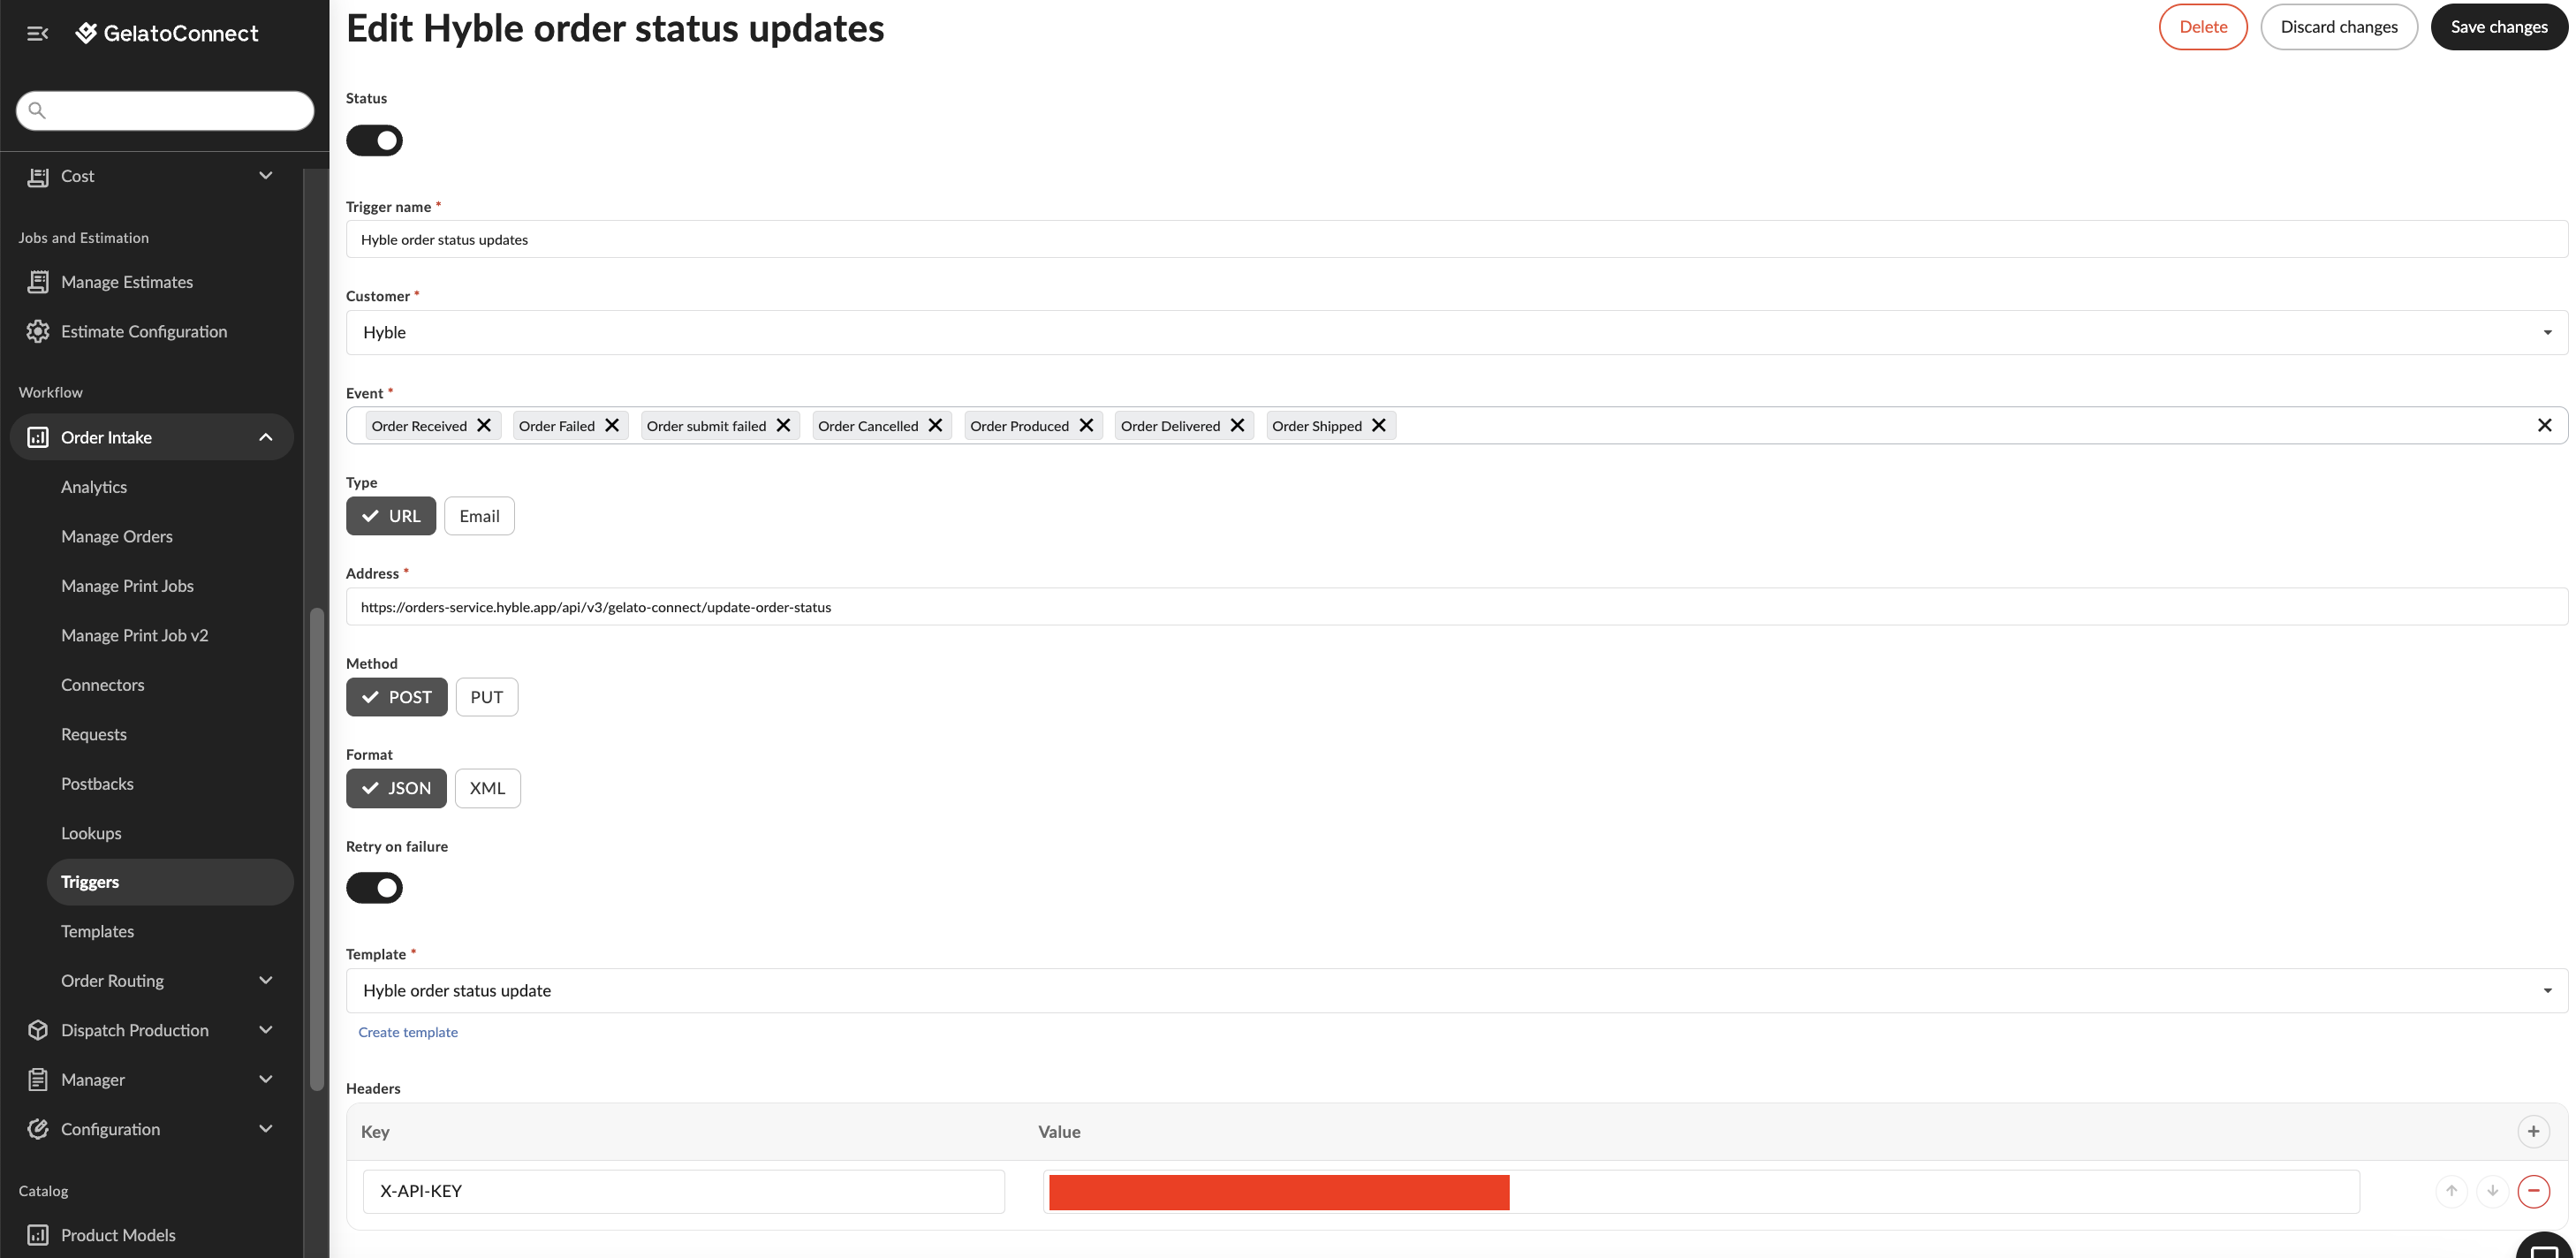
2) Create a new trigger to decide which order status update events Hyble should receive:
Navigate to Workflow > Order Intake > Triggers
Click "Add trigger".
Give the trigger the name "Hyble order status updates"
In the event field select the following events:
Order Received
Order Failed
Order Submit Failed
Order Cancelled
Order Produced
Order Delivered
Order Shipped
Choose type "URL"
Choose Method "POST"
Choose Format "JSON"
Choose the "Hyble order status update" template you created in step 6.1. above from the template dropdown.
In the headers section at the bottom add a Key X-API-KEY with the Value as the secret X-API-KEY you created with the connector in step 3.1.
In the headers section at the bottom also add a Key companyName with the Value as the your company name (the exact wording can be found by navigating to https://network.gelato.com/profile-settings and copying the name displayed in the Print house dropdown).
Click "Add trigger" in the top right to save and activate the trigger.