
Now that you've configured all the tabs in Estimate Configuration, you're ready to move into the testing phase. The purpose of this step is to create real estimates across your product categories and validate that the system produces accurate results.
This article is organized into three parts: Final Price Validation, Advanced Estimate Editing, and Multi-Product Estimates.
Part 1: Final Price Validation
(Video) Walkthrough: Create Real Estimates and Validate
The Validation Approach
Before going live, build confidence that your configuration produces accurate estimates by comparing AI-Estimator results against your existing system.
Create a Comparison Matrix
We recommend creating a structured test plan:
List your key categories: Identify the product types you estimate most frequently
Define popular specs for each: Choose your most common specifications per category (e.g., A5 flyer, 200 GSM silk, full color)
Test quantity sensitivity: Run multiple quantities (e.g., 500, 1000, 2500, 5000) to see how pricing scales
Record existing prices: Get the prices from your current MIS or calculation method
Compare with AI-Estimator: Run the same specs and quantities, then analyze deviations
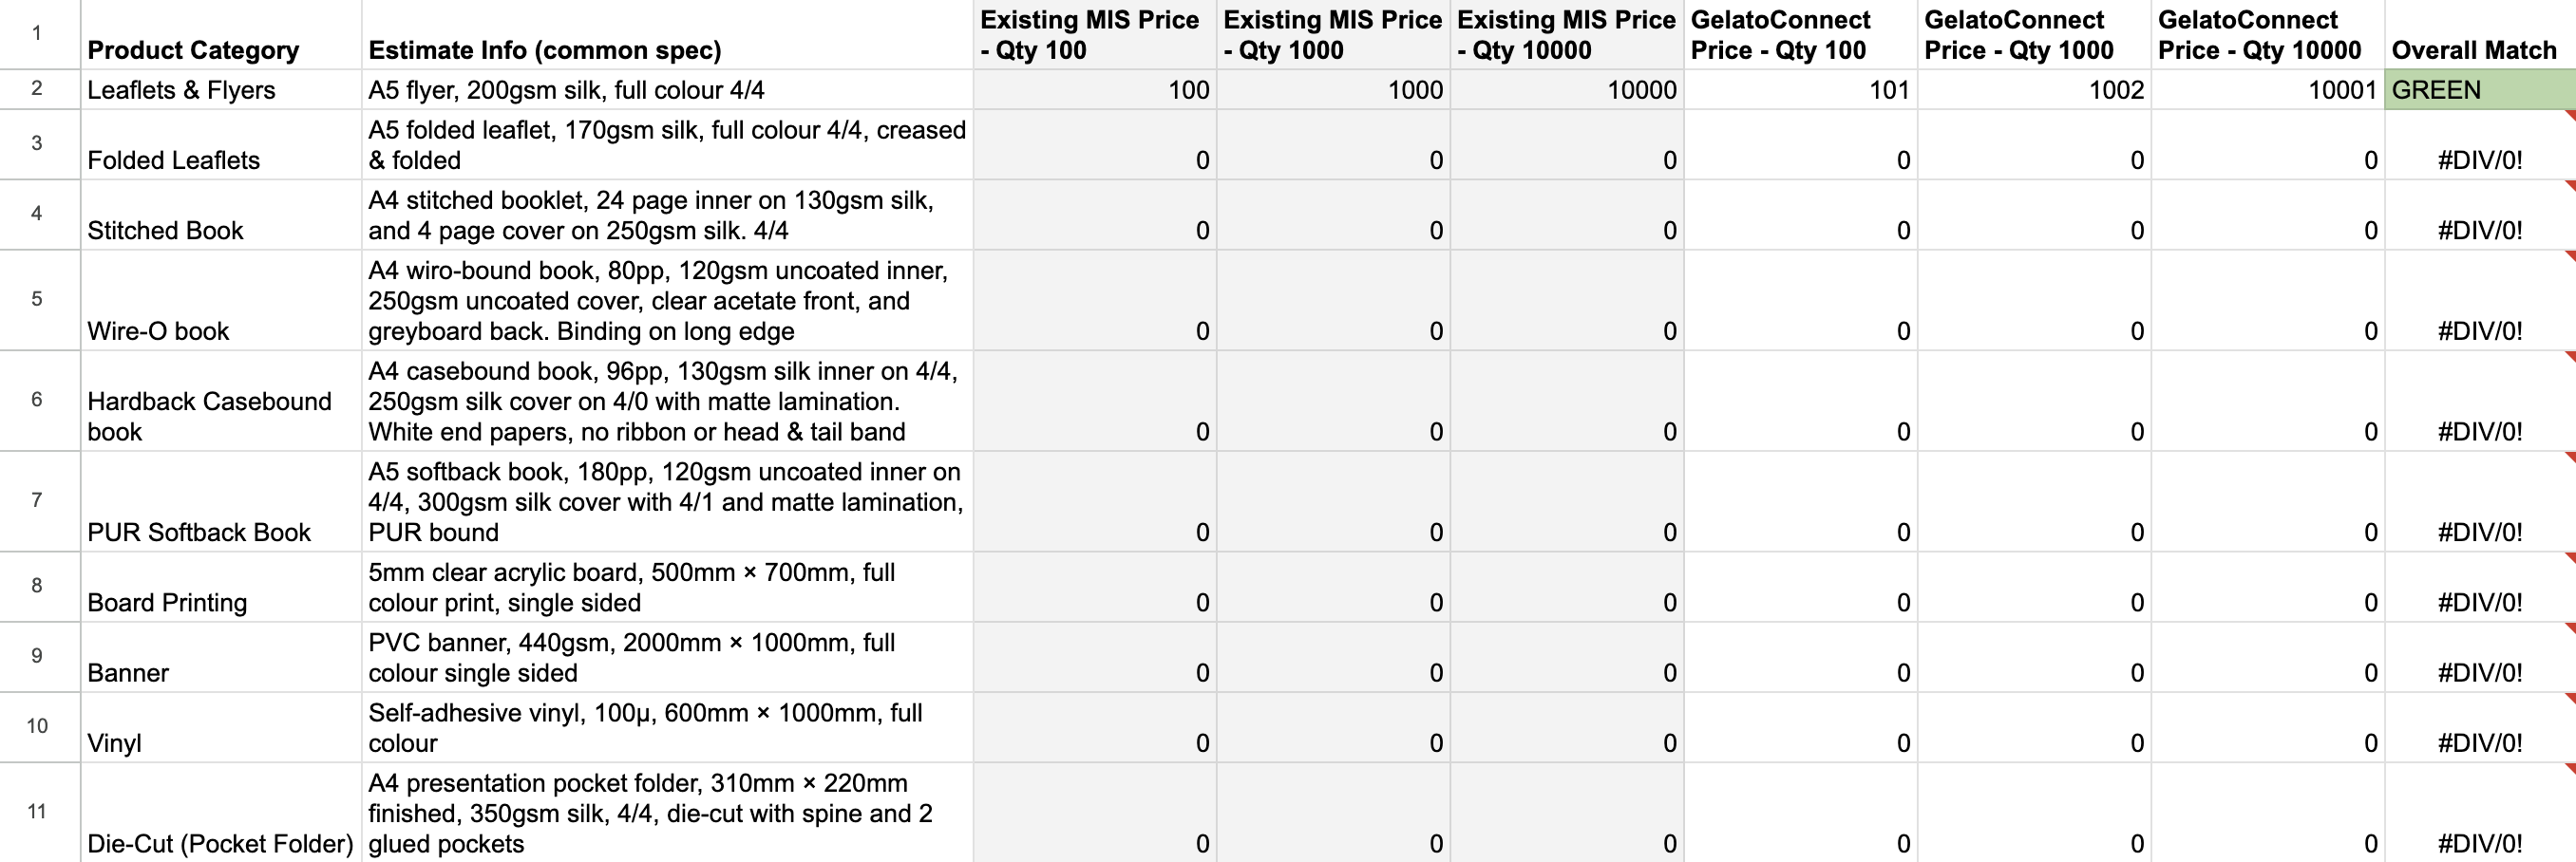
Understanding Acceptable Deviations
Exact matches are not the goal—and often not achievable because:
Different systems calculate spoilage differently (percentage vs. fixed)
Rounding approaches vary
Imposition logic may differ slightly
Focus on whether prices fall within an acceptable range for your business. Also consider that your existing system may have its own inaccuracies—some PSPs adopt AI-Estimator specifically because they've lost confidence in their current pricing.
Debugging Deviations
When you see larger-than-expected deviations, investigate systematically:
1. Check Cost Inputs First
In your Machine and Substrate Setup Sheet, verify:
Machine rates and speeds match your actual operation
Paper prices are current
Labor rates are accurate
2. Review Markups
In the Categories tab of Product Setup, confirm your markup percentages align with your pricing strategy. For testing, you can temporarily set markups to zero to isolate cost calculation accuracy.
3. Examine Price Breakdown
The Price Breakdown in AI-Estimator shows costs by production step (print, cut, fold, etc.). Compare these step-by-step against your existing system to identify exactly where deviations occur.
4. View Detailed Calculations
For deeper analysis, open the Estimate Breakdown and click "View and Edit" on any step to see the complete calculation: number of sheets, cuts, passes, and how each parameter was applied.
5. Adjust Pricing Rules
If costs are accurate but final prices need adjustment—especially for quantity curves—create or modify Pricing Rules. Use price tables to smooth out quantity-based pricing rather than making configuration changes.
Sign-Off and Handover
Once each category validates within acceptable tolerances, mark it complete. When all critical categories pass validation, you can confidently hand over to your estimation team for production use.
Part 2: Advanced Estimate Editing for Custom Jobs
(Video) Walkthrough: Advanced Estimate Editing
AI-Estimator handles the majority of requests automatically, but some jobs require manual customization. Here's how to handle complex requirements.
Using the AI Assistant for Changes
You can ask the AI assistant to make modifications using natural language. For example:
"Add three versions of cover split equally"
"Change the quantity to 2500"
"Add soft-touch lamination to the cover"
The AI will update the estimate and recalculate prices automatically.
Editing the Form Directly
For precise control, edit the estimate form:
Change quantities, dimensions, or specifications
Prices recalculate instantly as you make changes
Click "Show More" to reveal advanced options like inner lamination or spot finishing that aren't shown by default
Adding Additional Options
Use the "Additional Options" section to add finishing operations from your Price Models:
Shrink wrapping (specify group size)
Poly bagging
Drilling
Corner rounding
Any operation defined in your price models
Operations set to "Show by Default: Yes" appear above the fold. Click "Show More" to access all available add-ons.
Adding Custom Costs
For one-off charges not defined in your configuration—such as outwork from a supplier:
Click "Add Custom Cost"
Enter a description (e.g., "Outwork for specialty lamination")
Select the cost type (material, labor, machine, delivery, outwork)
Choose the pricing model (fixed total, setup + per unit)
Enter the amount
Optionally attach the supplier's quote document for reference
Custom costs appear in the Price Breakdown and have your configured markup applied.
Working with Versions
For jobs with multiple cover designs or inner variations:
Add versions and specify quantities for each
The system calculates plate changes (for offset) and adjusts run lengths
Total quantity is the sum of all version quantities
Adjusting Margins
If you need to adjust the final price:
Override specific markup percentages
Apply a manual price adjustment
Add or remove pricing rule effects
All adjustments are visible in the Price Breakdown for transparency.
Part 3: Multi-Product Estimates
For estimates containing multiple products (tender responses, bundled quotes), use the Multi-Product Estimate flow explained in [How to Create Multi-Product Estimates]
This flow supports:
Adding multiple products to a single estimate
Excel upload for large RFQs with dozens of products
Consolidated quote letters showing all products
Individual and total pricing