
Introduction
Welcome to GelatoConnect AI-Estimator! This guide is your step-by-step roadmap to set up and start using the fastest quoting engine in print. By the end, you'll have configured the system so your team can create accurate estimates in seconds and win more jobs.
Key Benefits:
Growth: Win more jobs by being the first to respond with confidence. Generate initial estimates in 15 seconds and get quotes to customers in under five minutes.
Efficiency: Let AI do the heavy lifting while freeing up your sales team and estimators to invest time in customers and higher-value work.
Control: Use data-driven insights and pricing rules to gain more control over your margins
(Video) Walkthrough: Introduction to AI-Estimator
Implementation Plan
The onboarding plan below is based on successful implementations with other PSPs. To make this work, you’ll need to assign a clear owner from your team — typically your MIS administrator or Head of Estimation. This role requires a solid understanding of your machines, products, and cost setup.
With the right owner in place, following this checklist and working closely with your Gelato Implementation Manager, onboarding can be completed in as little as two weeks.
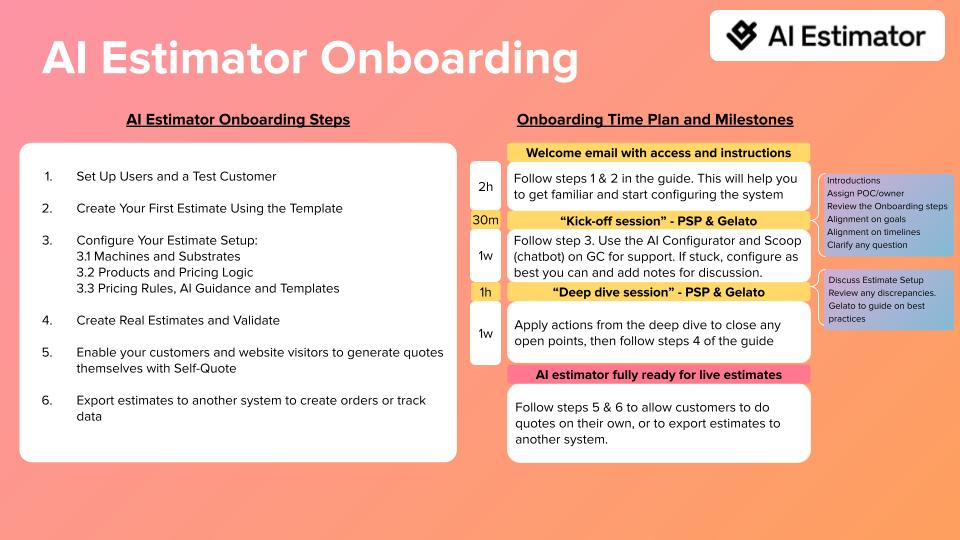
AI-Estimator Onboarding Checklist
Follow these steps to get your AI-Estimator up and running.
Step | Description | Complete (Yes/No) |
1. | Set Up Users and a Test Customer |
|
2. | Create Your First Estimate Using the Template |
|
3. | Configure Estimate Setup |
|
3.1. | Configure Machines and Substrates |
|
3.2. | Configure Products and Reference data |
|
3.3. | Configure Pricing rules and Settings |
|
4. | Create Real Estimates and Validate |
|
5. | Enable Customers and Website Visitors to Generate Quotes with Self-Quote |
|
6. | Export Estimates to Other System to Create Orders or Track Data |
|
Step-by-Step Overview
1. Set Up Users and a Test Customer
Goal: Give your team access to AI-Estimator with the right permissions and create a customer for testing.
What You'll Do: Add team members as users with either MIS User access (view and create estimates only) or MIS Manager access (full configuration and analytics). Create a test customer with estimation enabled so you can save and test estimates during setup.
2. Create Your First Estimate Using the Template
Goal: Experience the AI-Estimator workflow before customizing it, so you understand what your team will see.
What You'll Do: Using the pre-loaded template, create test estimates by copying customer requests (text, screenshots, or PDFs) into the AI chat. Watch how the AI translates requests into estimates in seconds and explore the different price options based on your machines.
3. Configure Estimate Setup
Goal: Define your machines, products, and business rules — the foundation of how AI-Estimator generates prices. With the new Estimate Setup page and AI Configurator, this process is AI-assisted and can be completed in days, not weeks or months.
What You'll Do: Use the Estimate Setup page in GelatoConnect to configure your production capabilities, product catalog, and pricing logic. Speed up configuration with the AI Configurator by uploading your existing data (price lists, spec sheets, or MIS exports) and letting the AI do the heavy lifting. Step 3 is divided into three substeps (3.1, 3.2, 3.3) detailed below.
3.1. Configure Machines and Substrates
Goal: Define your production capabilities — the substrates you stock and the machines you operate.
What You'll Do: In the Estimate Setup page, configure your substrates (with prices, sizes, and weights), presses, and all post-press equipment. Use tags to link substrates to compatible machines.
3.2. Configure Products and Reference data
Goal: Define the products you sell, their production workflows, and how they're priced.
What You'll Do: In the Estimate Setup page, configure product categories with their production steps, set your price adjustment model (Gross Profit %, VA %, or VA per press hour), define markups, and set up packaging and shipping.
3.3. Configure Pricing rules and Settings
Goal: Codify your business rules and customize the customer experience.
What You'll Do: Create pricing rules to handle customer-specific rates, volume discounts, and product exceptions—replacing tribal knowledge with systematic logic. Customize your quote letter template with your branding.
4. Create Real Estimates and Validate
Goal: Build confidence that your configuration produces accurate prices before going live.
What You'll Do: Create a comparison matrix of your key products and quantities. Run the same specs through your existing system and AI-Estimator, then analyze deviations. Use the Price Breakdown to debug any issues and adjust costs, markups, or pricing rules until results align with expectations.
5. Enable Customers and Website Visitors to Generate Quotes with Self-Quote
Goal: Let customers get instant quotes directly from your website or customer portal.
What You'll Do: Embed the Self-Quote iframe on your website. Customize the appearance with your colors and branding. Optionally invite specific customers to log in for personalized pricing based on their account rules.
6. Export Estimates to your MIS or Other Systems
Goal: Automatically send estimate data to your MIS or other systems when jobs are won.
What You'll Do: Configure the export connection with your destination URL and authentication. Set triggers (manual or automatic on status change). Define any custom fields your MIS requires. Monitor exports via the Export Log to troubleshoot any integration issues.